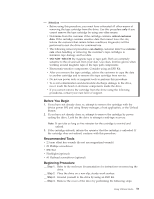
IBM 25R0012 User Guide - Page 70
spooled, supply, pulled, leader, broken, front, mid-tape, tangled, along
 |
UPC - 000435800176
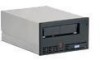
View all IBM 25R0012 manuals
Add to My Manuals
Save this manual to your list of manuals |
Page 70 highlights
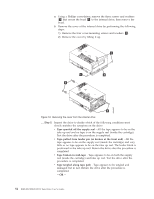
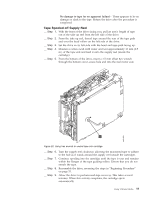
a. Using a Phillips screwdriver, remove the three screws and washers 1 that secure the bezel 2 to the internal drive, then remove the bezel. b. Remove the cover of the internal drive by performing the following steps: 1) Remove the four cover-mounting screws and washers 3 . 2) Remove the cover by lifting it up. 1 1 2 3 a82ru007 3 Figure 19. Removing the cover from the internal drive __ Step 5. Inspect the drive to decide which of the following conditions most closely matches the symptom on the drive: v Tape spooled off the supply reel - All the tape appears to be on the take up reel and no tape is on the supply reel (inside the cartridge). Test the drive after the procedure is completed. v Tape pulled from leader pin (or broken at the front end) - All the tape appears to be on the supply reel (inside the cartridge) and very little or no tape appears to be on the take up reel. The leader block is positioned in the take up reel. Return the drive after the procedure is completed. v Tape broken in mid-tape - Tape appears to be on both the supply reel (inside the cartridge) and take up reel. Test the drive after the procedure is completed. v Tape tangled along tape path - Tape appears to be tangled and damaged but in tact. Return the drive after the procedure is completed. -- OR -- 54 IBM 400/800GB LTO3 Tape Drive User's Guide
-
 1
1 -
2
-
3
-
4
-
5
-
6
-
7
-
8
-
9
-
10
-
11
-
12
-
13
-
14
-
15
-
16
-
17
-
18
-
19
-
20
-
21
-
22
-
23
-
24
-
25
-
26
-
27
-
28
-
29
-
30
-
31
-
32
-
33
-
34
-
35
-
36
-
37
-
38
-
39
-
40
-
41
-
42
-
43
-
44
-
45
-
46
-
47
-
48
-
49
-
50
-
51
-
52
-
53
-
54
-
55
-
56
-
57
-
58
-
59
-
60
-
61
-
62
-
63
-
64
-
 65
65 -
 66
66 -
 67
67 -
 68
68 -
 69
69 -
 70
70 -
 71
71 -
 72
72 -
 73
73 -
 74
74 -
 75
75 -
76
-
77
-
78
-
79
-
80
-
81
-
82
-
83
-
84
-
85
-
86
-
87
-
88
-
89
-
90
-
91
-
92
-
93
-
94
-
95
-
96
-
97
-
98
-
99
-
100
-
101
-
102
-
103
-
104
-
105
-
106
-
107
-
108
-
109
-
110
-
111
-
112
-
113
-
114
-
115
-
116
-
117
-
118
-
119
-
120
 |
 |
