IBM 25R0012 User Guide - Page 72
Pulled, Broken, Leader
 |
UPC - 000435800176
View all IBM 25R0012 manuals
Add to My Manuals
Save this manual to your list of manuals |
Page 72 highlights
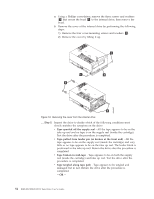
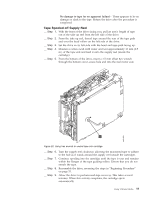
__ Step 10. Test the drive (see "Connect and Test Power to the Drive" on page 9) to determine if it should be replaced. Tape Pulled from or Broken near Leader Pin 2 8 1 3 7 6 5 9 4 a82ru009 Figure 21. Drive with cover removed to reveal gear train. 1 Loader motor worm gear 6 Threader mechanism gear 2 Cartridge loader tray guide bearing 7 Lever 3 Rotator stub 8 Loader mechanism gear 4 Threader motor worm gear 9 Threader worm gear 5 Threader intermediate gear __ Step 1. From the left side of the drive, pull out tape from the take up reel. Note: If there is more than approximately 0.6 m (2 ft.) of tape on the take up reel, go to "Tape Broken in Mid-tape" on page 57. __ Step 2. If there is less than approximately 0.6 m (2 ft.) of tape on the take up reel, cut off the excess tape as close to the leader pin, as possible. __ Step 3. Locate the threader motor worm gear 4 the rear of the drive. You can either: a. Use your finger to rotate the threader motor worm gear and slowly rotate the threader mechanism gear 6 clockwise; or b. Use a #1 flathead screwdriver to turn the threader worm gear 9 clockwise. This rotates the threader motor worm gear 4 clockwise, drawing the tape leader block assembly (LBA) into the cartridge. 56 IBM 400/800GB LTO3 Tape Drive User's Guide
-
 1
1 -
2
-
3
-
4
-
5
-
6
-
7
-
8
-
9
-
10
-
11
-
12
-
13
-
14
-
15
-
16
-
17
-
18
-
19
-
20
-
21
-
22
-
23
-
24
-
25
-
26
-
27
-
28
-
29
-
30
-
31
-
32
-
33
-
34
-
35
-
36
-
37
-
38
-
39
-
40
-
41
-
42
-
43
-
44
-
45
-
46
-
47
-
48
-
49
-
50
-
51
-
52
-
53
-
54
-
55
-
56
-
57
-
58
-
59
-
60
-
61
-
62
-
63
-
64
-
65
-
66
-
 67
67 -
 68
68 -
 69
69 -
 70
70 -
 71
71 -
 72
72 -
 73
73 -
 74
74 -
 75
75 -
 76
76 -
 77
77 -
78
-
79
-
80
-
81
-
82
-
83
-
84
-
85
-
86
-
87
-
88
-
89
-
90
-
91
-
92
-
93
-
94
-
95
-
96
-
97
-
98
-
99
-
100
-
101
-
102
-
103
-
104
-
105
-
106
-
107
-
108
-
109
-
110
-
111
-
112
-
113
-
114
-
115
-
116
-
117
-
118
-
119
-
120
 |
 |
