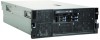
IBM 72336RU User Manual - Page 48
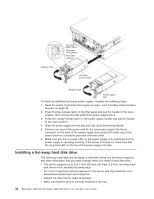
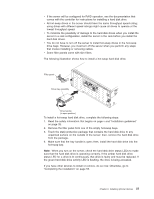
Installing a hot-swap hard disk drive
 |
View all IBM 72336RU manuals
Add to My Manuals
Save this manual to your list of manuals |
Page 48 highlights
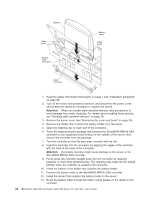
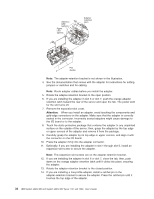
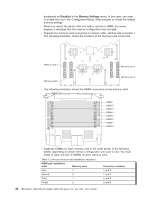
Release latch AC power LED (green) DC power LED (green) Error LED (amber) Hot-swap power supply Release latch Power supply filler To install an additional hot-swap power supply, complete the following steps: 1. Read the safety information that begins on page v and "Handling static-sensitive devices" on page 30. 2. Press the blue release latch on the filler panel and pull the handle to the open position, then remove the filler panel from power-supply bay 2. 3. Press the orange release latch on the power-supply handle and pull the handle to the open position. 4. Slide the power supply into the bay and fully close the locking handle. 5. Connect one end of the power cord for the new power supply into the ac connector on the back of the power supply, and connect the other end of the power cord into a properly grounded electrical outlet. 6. Make sure that the ac power LED on the power supply is lit, indicating that the power supply is operating correctly. If the server is turned on, make sure that the dc power LED on the top of the power supply is lit also. Installing a hot-swap hard disk drive The following notes describe the types of hard disk drives that the server supports and other information that you must consider when you install a hard disk drive: v The server supports up to four 1-inch (26 mm) slim-high, 2.5-inch, hot-swap hard disk drives in the standard hot-swap bays. v For a list of supported optional devices for the server, see http://www.ibm.com/ servers/eserver/serverproven/compat/us/. v Inspect the drive tray for signs of damage. v Make sure that the drive is correctly installed in the tray. 36 IBM System x3850 M2 and System x3950 M2 Types 7141 and 7233: User's Guide
-
 1
1 -
2
-
3
-
4
-
5
-
6
-
7
-
8
-
9
-
10
-
11
-
12
-
13
-
14
-
15
-
16
-
17
-
18
-
19
-
20
-
21
-
22
-
23
-
24
-
25
-
26
-
27
-
28
-
29
-
30
-
31
-
32
-
33
-
34
-
35
-
36
-
37
-
38
-
39
-
40
-
41
-
42
-
 43
43 -
 44
44 -
 45
45 -
 46
46 -
 47
47 -
 48
48 -
 49
49 -
 50
50 -
 51
51 -
 52
52 -
 53
53 -
54
-
55
-
56
-
57
-
58
-
59
-
60
-
61
-
62
-
63
-
64
-
65
-
66
-
67
-
68
-
69
-
70
-
71
-
72
-
73
-
74
-
75
-
76
-
77
-
78
-
79
-
80
-
81
-
82
-
83
-
84
-
85
-
86
-
87
-
88
-
89
-
90
-
91
-
92
-
93
-
94
-
95
-
96
-
97
-
98
-
99
-
100
-
101
-
102
 |
 |
