IBM 72336RU User Manual - Page 63
Product support, System x, Popular links, Software and device drivers, IBM System x3850 M2
 |
View all IBM 72336RU manuals
Add to My Manuals
Save this manual to your list of manuals |
Page 63 highlights
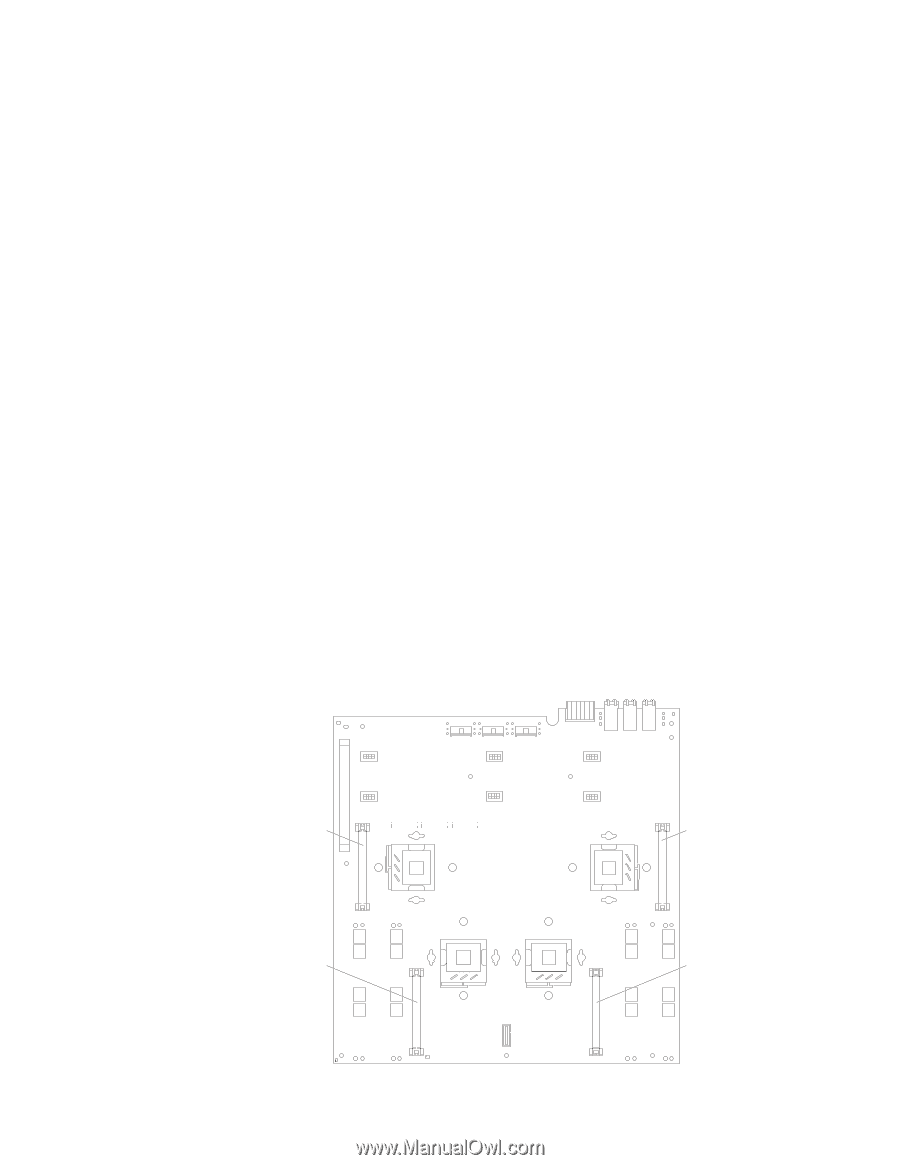
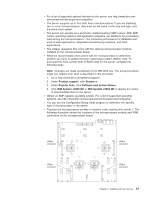
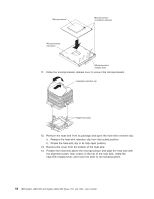
v For a list of supported optional devices for the server, see http://www.ibm.com/ servers/eserver/serverproven/compat/us/. v The server supports up to four Intel Xeon microprocessors. If you are installing two or more microprocessors, they must be the same cache size and type, and the same clock speed. v The server can operate as a symmetric multiprocessing (SMP) server. With SMP, certain operating systems and application programs can distribute the processing load among the microprocessors. This enhances performance for database and point-of-sale applications, integrated manufacturing solutions, and other applications. v The voltage regulators that come with the optional microprocessor must be installed on the microprocessor board. v Read the documentation that comes with the microprocessor to determine whether you have to update the basic input/output system (BIOS) code. To download the most current level of BIOS code for the server, complete the following steps. Note: Changes are made periodically to the IBM Web site. The actual procedure might vary slightly from what is described in this document. 1. Go to http://www.ibm.com/systems/support/. 2. Under Product support, click System x. 3. Under Popular links, click Software and device drivers. 4. Click IBM System x3850 M2 or IBM System x3950 M2 to display the matrix of downloadable files for the server. v Obtain an SMP-capable operating system. For a list of supported operating systems, see http://www.ibm.com/servers/eserver/serverproven/compat/us/. v You can use the Configuration/Setup Utility program to determine the specific type of microprocessor in the server. v Populate the microprocessor sockets in numeric order, starting with socket 1. The following illustration shows the locations of the microprocessor sockets and VRM connectors on the microprocessor board. VRM 3 connector VRM 1 connector VRM 4 connector 3 4 1 2 VRM 2 connector Chapter 2. Installing optional devices 51
-
 1
1 -
2
-
3
-
4
-
5
-
6
-
7
-
8
-
9
-
10
-
11
-
12
-
13
-
14
-
15
-
16
-
17
-
18
-
19
-
20
-
21
-
22
-
23
-
24
-
25
-
26
-
27
-
28
-
29
-
30
-
31
-
32
-
33
-
34
-
35
-
36
-
37
-
38
-
39
-
40
-
41
-
42
-
43
-
44
-
45
-
46
-
47
-
48
-
49
-
50
-
51
-
52
-
53
-
54
-
55
-
56
-
57
-
 58
58 -
 59
59 -
 60
60 -
 61
61 -
 62
62 -
 63
63 -
 64
64 -
 65
65 -
 66
66 -
 67
67 -
 68
68 -
69
-
70
-
71
-
72
-
73
-
74
-
75
-
76
-
77
-
78
-
79
-
80
-
81
-
82
-
83
-
84
-
85
-
86
-
87
-
88
-
89
-
90
-
91
-
92
-
93
-
94
-
95
-
96
-
97
-
98
-
99
-
100
-
101
-
102
 |
 |