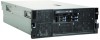
IBM 72336RU User Manual - Page 49
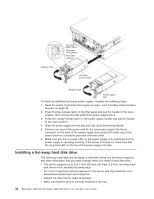
from the package., Make sure that the tray handle is open; then, install the hard disk drive into
 |
View all IBM 72336RU manuals
Add to My Manuals
Save this manual to your list of manuals |
Page 49 highlights
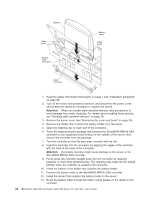
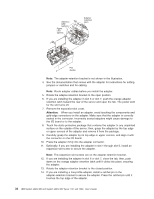
v If the server will be configured for RAID operation, see the documentation that comes with the controller for instructions for installing a hard disk drive. v All hot-swap drives in the server should have the same throughput speed rating; using drives with different speed ratings might cause all drives to operate at the lowest throughput speed. v To minimize the possibility of damage to the hard disk drives when you install the server in a rack configuration, install the server in the rack before you install the hard disk drives. v You do not have to turn off the server to install hot-swap drives in the hot-swap drive bays. However, you must turn off the server when you perform any steps that involve installing or removing cables. v Some filler panels come with slim fillers. The following illustration shows how to install a hot-swap hard disk drive. Filler panel Drive-tray assembly Drive handle (in open position) To install a hot-swap hard disk drive, complete the following steps: 1. Read the safety information that begins on page v and "Installation guidelines" on page 28. 2. Remove the filler panel from one of the empty hot-swap bays. 3. Touch the static-protective package that contains the hard disk drive to any unpainted surface on the outside of the server; then, remove the hard disk drive from the package. 4. Make sure that the tray handle is open; then, install the hard disk drive into the hot-swap bay. Note: When you turn on the server, check the hard disk drive status LEDs to make sure that the hard disk drive is operating correctly. If the amber hard disk drive status LED for a drive is lit continuously, that drive is faulty and must be replaced. If the green hard disk drive activity LED is flashing, the drive is being accessed. If you have other devices to install or remove, do so now. Otherwise, go to "Completing the installation" on page 55. Chapter 2. Installing optional devices 37
-
 1
1 -
2
-
3
-
4
-
5
-
6
-
7
-
8
-
9
-
10
-
11
-
12
-
13
-
14
-
15
-
16
-
17
-
18
-
19
-
20
-
21
-
22
-
23
-
24
-
25
-
26
-
27
-
28
-
29
-
30
-
31
-
32
-
33
-
34
-
35
-
36
-
37
-
38
-
39
-
40
-
41
-
42
-
43
-
 44
44 -
 45
45 -
 46
46 -
 47
47 -
 48
48 -
 49
49 -
 50
50 -
 51
51 -
 52
52 -
 53
53 -
 54
54 -
55
-
56
-
57
-
58
-
59
-
60
-
61
-
62
-
63
-
64
-
65
-
66
-
67
-
68
-
69
-
70
-
71
-
72
-
73
-
74
-
75
-
76
-
77
-
78
-
79
-
80
-
81
-
82
-
83
-
84
-
85
-
86
-
87
-
88
-
89
-
90
-
91
-
92
-
93
-
94
-
95
-
96
-
97
-
98
-
99
-
100
-
101
-
102
 |
 |
