Icom IC-R8600 Instruction Manual Version 1.01 - Page 26
Confirm, Step 2. Settings on the PC's Remote Utility application Continued
 |
View all Icom IC-R8600 manuals
Add to My Manuals
Save this manual to your list of manuals |
Page 26 highlights
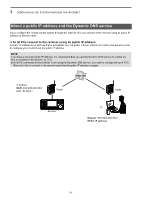
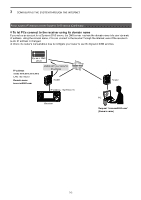
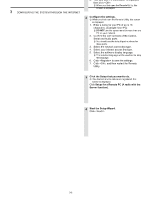
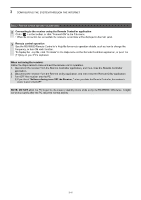
3 CONFIGURING THE SYSTEM THROUGH THE INTERNET Step 2. Settings on the PC's Remote Utility application (Continued) 5 Enter the Server Information. 1. Enter the receiver's domain name or public IP Address. 2. Confirm the Control Port number. LLYou should use the default port number for this port. 3. Click >. 6 Enter the User ID and Password. 1. Enter the User ID and Password that are registered to the receiver. 2. Click >. •• After clicking >, connects to the Server. 1Enter 2Confirm 3Click 1Enter 2Enter (Example: USER0001) 3Click NOTE: If you cannot connect to the Server, an error dialog is displayed. Click
-
 1
1 -
2
-
3
-
4
-
5
-
6
-
7
-
8
-
9
-
10
-
11
-
12
-
13
-
14
-
15
-
16
-
17
-
18
-
19
-
20
-
 21
21 -
 22
22 -
 23
23 -
 24
24 -
 25
25 -
 26
26 -
 27
27 -
 28
28 -
 29
29 -
 30
30 -
 31
31 -
32
-
33
-
34
-
35
-
36
-
37
-
38
-
39
-
40
-
41
-
42
-
43
-
44
-
45
-
46
-
47
-
48
-
49
 |
 |

3-7
3
CONFIGURING THE SYSTEM THROUGH THE INTERNET
Step 2. Settings on the PC’s Remote Utility application (Continued)
5
Enter the Server Information.
1.
Enter the receiver’s domain name or public
IP Address.
2.
Confirm the Control Port number.
L
You should use the default port number for this
port.
3. Click <Next>>.
1
Enter
3
Click
6
1
Enter
3
Click
2
Enter
NOTE:
If you cannot connect to the Server, an error dialog
is displayed.
Click <<Back>, and confirm the settings.
(Example: USER0001)
Enter the User ID and Password.
1.
Enter the User ID and Password that are
registered to the receiver.
2. Click <Next>>.
•
After clicking <Next>>, connects to the Server.
7
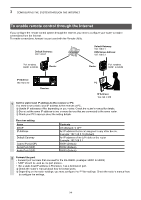
Adding the Server has been completed.
1.
Enter the Server Description.
L
The Server Address or Network Name is
entered by default.
2. Click <Finish>.
1
Enter
2
Click
2
Confirm