Icom M802 Instruction Manual - Page 4
Iquick Reference - channel list
 |
View all Icom M802 manuals
Add to My Manuals
Save this manual to your list of manuals |
Page 4 highlights
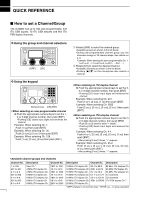
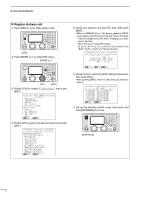
QUICK REFERENCE I How to set a Channel/Group The IC-M802 has up to 160 user-programmable, 242 ITU SSB duplex, 72 ITU SSB simplex and 662 ITU FSK duplex channels. D Using the group and channel selectors [GRP] [CH] q Rotate [GRP] to select the desired group. • Available groups are shown in the list below. •During user-programmable channel group use, the channels change in 20-channel steps. See details on p. 8. Example; When starting the user-programmable Ch. 1. 1⇔21⇔41...141⇔401⇔4-1⇔601......25-1...1 w Rotate [CH] to select the desired channel. • Available channels are shown in the list below. • Pushing [Y]/[Z] on the microphone also selects a channel. D Using the keypad Numeral keys [CE] [ENT] • When selecting an user-programmable channel ➥ Push the appropriate numeral keys to set the 1, 2 or 3-digit channel number, then push [ENT] •Pushing [CE] clears input digits and retrieves the channel. Example; When selecting Ch. 1. Push [1 NB] then push [ENT]. Example; When selecting Ch. 35. Push [3 SCAN], [5 AGC×] then push [ENT]. Example; When selecting Ch. 128. Push [1 NB], [2 SQL], [8 Mid] then push [ENT]. • When selecting an ITU duplex channel ➥ Push the appropriate numeral keys to set the 3, 4 or 5-digit channel number, then push [ENT] •Pushing [CE] clears input digits and retrieves the channel. Example; When selecting Ch. 401. Push [4 SP×], [0 DIM], [1 NB] then push [ENT]. Example; When selecting Ch. 2505. Push [2 SQL], [5 AGC×], [0 DIM], [5 AGC×] then push [ENT]. • When selecting an ITU simplex channel ➥ Push the appropriate numeral keys to set the 5 or 6-digit channel number, then push [ENT] • Push [0 DIM] 3 times to enter "- (dash)." •Pushing [CE] clears input digits and retrieves the channel. Example; When selecting Ch. 4-1. Push [4 SP×], [0 DIM], [0 DIM], [0 DIM], [1 NB] then push [ENT]. - After pushing [0 DIM] 3 times, "-" appears. Example; When selecting Ch. 25-2. Push [2 SQL], [5 AGC×], [0 DIM], [0 DIM], [0 DIM], [2 SQL] then push [ENT]. - After pushing [0 DIM] 3 times, "-" appears. • Available channel groups and channels Channel No. Description Channel No. Description Channel No. Description 1 to 160 401 to 427 4-1 to 4-9 601 to 608 6-1 to 6-9 801 to 832 8-1 to 8-9 User Ch.*1 4 MHz ITU duplex Ch. 4 MHz ITU simplex Ch. 6 MHz ITU duplex Ch. 6 MHz ITU simplex Ch. 8 MHz ITU duplex Ch. 8 MHz ITU simplex Ch. 1201 to 1241 12-1 to 12-9 1601 to 1656 16-1 to 16-9 1801 to 1815 18-1 to 18-9 2201 to 2253 12 MHz ITU duplex Ch. 22-1 to 22-9 22 MHz ITU simplex Ch. 12 MHz ITU simplex Ch. 2501 to 2510 25 MHz ITU duplex Ch. 16 MHz ITU duplex Ch. 25-1 to 25-9 25 MHz ITU simplex Ch. 16 MHz ITU simplex Ch. C1-1 to C1-21 C1 channels 18 MHz ITU duplex Ch. C2-1 to C2-31 C2 channels 18 MHz ITU simplex Ch. 4001 to 25040 ITU FSK duplex Ch.*2 22 MHz ITU duplex Ch. *1[GRP] changes in 20 channels steps. *2SITOR use- no group separation. I
-
 1
1 -
 2
2 -
 3
3 -
 4
4 -
 5
5 -
 6
6 -
 7
7 -
 8
8 -
 9
9 -
 10
10 -
11
-
12
-
13
-
14
-
15
-
16
-
17
-
18
-
19
-
20
-
21
-
22
-
23
-
24
-
25
-
26
-
27
-
28
-
29
-
30
-
31
-
32
-
33
-
34
-
35
-
36
-
37
-
38
-
39
-
40
-
41
-
42
-
43
-
44
-
45
-
46
-
47
-
48
-
49
-
50
-
51
-
52
-
53
-
54
-
55
-
56
-
57
-
58
-
59
-
60
-
61
-
62
-
63
-
64
-
65
-
66
-
67
-
68
-
69
-
70
-
71
-
72
-
73
-
74
-
75
-
76
-
77
-
78
 |
 |