Icom M802 Instruction Manual - Page 6
Basic voice transmission and reception - microphone
 |
View all Icom M802 manuals
Add to My Manuals
Save this manual to your list of manuals |
Page 6 highlights
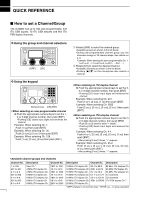
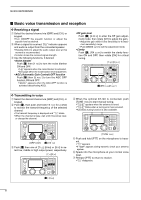
QUICK REFERENCE I Basic voice transmission and reception D Receiving a signal q Select the desired channel via [GRP] and [CH], or keypad. • Turn ON/OFF the squelch function or adjust the squelch level as desired. w When a signal is received, "RX" indicator appears and audio is output from the connected speaker. • Rotating [VOL] to adjust the audio output level at this moment is recommended. • S-meter shows the received signal strength. e Use the following functions, if desired: • Noise blanker Push [F] then [1 NB] to turn the noise blanker ON and OFF. • "NB" appears when the noise blanker is activated. • See page 48 for the noise blanker level adjustment. • AGC (Automatic Gain Control) OFF function Push [F] then [5 AGC×] to turn the AGC OFF function ON and OFF. •" AGC" appears when the AGC-OFF function is activated (deactivating AGC). • RF gain level Push [F], [6 RF-G] to enter the RF gain adjustment mode, then rotate [CH] to adjust the gain. • Adjust the gain within 0 (low sensitivity) to 9 (maximum sensitivity) range. • Push [MODE SET] to exit the adjustment mode. • Clarity Push [F], [RX CLAR] to switch the clarity function ON and OFF, then rotate [CH] for critical tuning. [1 NB] [6 RF-G] [F] [RX CLAR] [5 AGC×] D Transmitting in voice q Select the desired channel via [GRP] and [CH], or keypad. w Push [F], then push and hold [TX TXF] for a while to monitor the transmit frequency of the selected channel. • The transmit frequency is displayed and "TX" blinks. • When the channel is busy, wait until it becomes clear, or change the channel. r When the optional AT-140 is connected, push [TUNE THRU] to start manual tuning. • "TUNE" appears when the antenna is tuned. • "TUNE" blinks when a tuning error has occurred. • Automatic tuning function is also available. [GRP] [CH] [F] [TX TXF] e Push [F] then one of [7 Lo], [8 Mid] or [9 Hi] to select low, middle or high output power, respectively. [7 Lo] [9 Hi] [TUNE THRU] t Push and hold [PTT] on the microphone to transmit. • "TX" appears. • If "SWR" appears during transmit, check your antenna system. y Speak into the microphone at your normal voice level. u Release [PTT] to return to receive. • "TX" disappears. [F] [8 Mid] III
-
 1
1 -
 2
2 -
 3
3 -
 4
4 -
 5
5 -
 6
6 -
 7
7 -
 8
8 -
 9
9 -
 10
10 -
 11
11 -
 12
12 -
13
-
14
-
15
-
16
-
17
-
18
-
19
-
20
-
21
-
22
-
23
-
24
-
25
-
26
-
27
-
28
-
29
-
30
-
31
-
32
-
33
-
34
-
35
-
36
-
37
-
38
-
39
-
40
-
41
-
42
-
43
-
44
-
45
-
46
-
47
-
48
-
49
-
50
-
51
-
52
-
53
-
54
-
55
-
56
-
57
-
58
-
59
-
60
-
61
-
62
-
63
-
64
-
65
-
66
-
67
-
68
-
69
-
70
-
71
-
72
-
73
-
74
-
75
-
76
-
77
-
78
 |
 |
