JVC GY-HM600U GY-HM600U Instruction Manual (135 pages) - Page 124
Connecting External Devices, Managing/Editing Clips on a PC, Loading Clips to the PC USB
 |
View all JVC GY-HM600U manuals
Add to My Manuals
Save this manual to your list of manuals |
Page 124 highlights
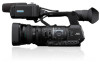
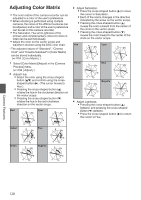
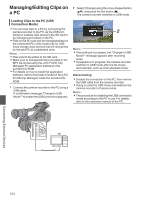
Managing/Editing Clips on a PC Loading Clips to the PC (USB Connection Mode) 0 You can load clips to a PC by connecting the camera recorder to the PC via the USB port. Doing so enables clips stored in the SD card to be managed and edited on the PC. 0 Files on the SD card can be managed/edited on the connected PC in this mode only for USB mass storage class devices that are recognized by the said PC as a peripheral drive. Memo : 0 Files cannot be written to the SD card. 0 Make sure to manage/edit files recorded in the MP4 file format using the (JVC ProHD Clip Manager) PC application software in the bundled CD-ROM. 0 For details on how to install the application software, refer to the [User's Guide] of the [JVC ProHD Clip Manager] inside the bundled CDROM. 1 Connect the camera recorder to the PC using a USB cable. A confirmation message "Change to USB Mode?" to enable the USB connection appears. 2 Select [Change] using the cross-shaped button (JK), and press the Set button (R). The camera recorder switches to USB mode. 2 . Memo : 0 If recording is in progress, the "Change to USB Mode?" message appears after recording stops. 0 If playback is in progress, the camera recorder switches to USB mode after the file closes automatically, such as when playback stops. Disconnecting 0 Disable the connection on the PC, then remove the USB cable from the camera recorder. 0 Doing so exits the USB mode and switches the camera recorder to Camera mode. Memo : 0 The procedure for disabling the USB connection varies according to the PC in use. For details, refer to the instruction manual of the PC. INPUT2 INPUT1 BATT.RELEASE A AUX P/OCWHGER DEVICE AV HD/SD B SDI HDMI REMOTE DC REC DEVICE AV PC . Connecting External Devices 124
-
 1
1 -
2
-
3
-
4
-
5
-
6
-
7
-
8
-
9
-
10
-
11
-
12
-
13
-
14
-
15
-
16
-
17
-
18
-
19
-
20
-
21
-
22
-
23
-
24
-
25
-
26
-
27
-
28
-
29
-
30
-
31
-
32
-
33
-
34
-
35
-
36
-
37
-
38
-
39
-
40
-
41
-
42
-
43
-
44
-
45
-
46
-
47
-
48
-
49
-
50
-
51
-
52
-
53
-
54
-
55
-
56
-
57
-
58
-
59
-
60
-
61
-
62
-
63
-
64
-
65
-
66
-
67
-
68
-
69
-
70
-
71
-
72
-
73
-
74
-
75
-
76
-
77
-
78
-
79
-
80
-
81
-
82
-
83
-
84
-
85
-
86
-
87
-
88
-
89
-
90
-
91
-
92
-
93
-
94
-
95
-
96
-
97
-
98
-
99
-
100
-
101
-
102
-
103
-
104
-
105
-
106
-
107
-
108
-
109
-
110
-
111
-
112
-
113
-
114
-
115
-
116
-
117
-
118
-
 119
119 -
 120
120 -
 121
121 -
 122
122 -
 123
123 -
 124
124 -
 125
125 -
 126
126 -
 127
127 -
 128
128 -
 129
129 -
130
-
131
-
132
-
133
-
134
-
135
-
136
 |
 |