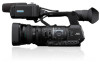
JVC GY-HM600U GY-HM600U Instruction Manual (135 pages) - Page 20
Side Control Panel, When Gain, Iris, and Shutter are set to AUTO
 |
View all JVC GY-HM600U manuals
Add to My Manuals
Save this manual to your list of manuals |
Page 20 highlights
Introduction Side Control Panel UTS R Q P A B C D E ND FILTER 1/64 1/16 1/4 OFF FOCUS AUTO MANU PUSH AUTO IRIS PUSH AUTO FOCUS ASSIST/1 OIS / 2 LOLUX / 3 TIME CODE MENU/THUMB AE LEVEL CANCEL GAIN WHT BAL SHUTTER L B M A H PRESET FULL AUTO ON OFF POWER ON OFF (CHG) MODE AE LOCK/4 ZEBRA/5 MARKER/6 O N F G IJ K L M H . A [FOCUS AUTO/MANU/∞] Focus Switch (A P45 [Focus Operation] ) B [ND FILTER] ND Filter Switch (A P53 [Setting the ND Filter] ) C [PUSH AUTO] Focus Push Auto Button (A P46 [One Push Auto Focus] ) D [IRIS] Iris Auto/Manual Selection Button (A P49 [Adjusting the Iris] ) E [PUSH AUTO] Iris Push Auto Button (A P49 [Adjusting the Iris] ) F [GAIN] Gain Auto/Manual Selection Button / [L/ M /H] Sensitivity Selection Switch (A P50 [Setting the Gain] ) G [WHT BAL] White Balance Auto/Manual Selection Button / [B/A/PRESET] Selection Switch (A P53 [Adjusting the White Balance] ) H [SHUTTER] Shutter Speed Auto/Manual Selection Button (A P51 [Setting the Electronic Shutter] ) I [y] One Push Auto White Balance Button J [FULL AUTO ON/OFF] Full Auto Switch (A P48 [Adjusting the Brightness Automatically] ) (A P56 [Automatic White Balance Mode (FAW: Fulltime Auto White balance)] ) K [AE LOCK/4] AE Lock/User 4 Button When Gain, Iris, and Shutter are set to "AUTO", their respective values and the value of white balance are locked when the [AE LOCK/4] button is pressed. You can also use it as a user button by assigning a specific feature in the menu setting to this button. (A P36 [Assigning Functions to User Buttons] ) 20 L [ZEBRA/5] Zebra/User 5 Button (A P65 [Setting Zebra Pattern] ) You can also use it as a user button by assigning a specific feature in the menu setting to this button. (A P36 [Assigning Functions to User Buttons] ) M [MARKER/6] Marker/User 6 Button This button toggles ON/OFF the marker, safety zone, and center mark displays. You can also use it as a user button by assigning a specific feature in the menu setting to this button. (A P36 [Assigning Functions to User Buttons] ) N [MODE] Camera/Media Mode Selection Button (A P16 [Operation Modes] ) O [POWER ON/OFF(CHG)] Lock Power ON/OFF Switch Turns ON/OFF the power. 0 Hold down the lock button (blue) in the center to toggle ON/OFF. 0 When the power is turning OFF, "P.OFF" appears on the LCD monitor and viewfinder. 0 Wait for 5 seconds or more to turn on the power again. P Cross-Shaped Button (JKHI)/Set Button (R) The function changes according to the operation status of the camera recorder. o During menu operation (all modes) (A P86 [Basic Operations in Menu Screen] ) Center Set button (R) : Confirms menu items and setting values Cross-shaped button : Selects menu items (JK) and setting values o During Camera mode Shutter operation: Center Set button (R) : Shutter ON/OFF Cross-shaped button : Switches shutter (JK) speed when shutter is ON AE level operation : Cross-shaped button (HI) Memo : 0 When [Camera Function] menu B [AE LEVEL SW] is set to "AE LEVEL/VFR", the crossshaped button (HI) is used to set the number of frames during Variable Frame Rec. (A P77 [Variable Frame Rec] ) (A P91 [ AE LEVEL SW ] ) Q [LOLUX/3] Low-light Shooting/User 3 Button For switching the low-light shooting mode ON or OFF. You can also use it as a user button by assigning a specific feature in the menu setting to this button. (A P36 [Assigning Functions to User Buttons] )
-
 1
1 -
2
-
3
-
4
-
5
-
6
-
7
-
8
-
9
-
10
-
11
-
12
-
13
-
14
-
 15
15 -
 16
16 -
 17
17 -
 18
18 -
 19
19 -
 20
20 -
 21
21 -
 22
22 -
 23
23 -
 24
24 -
 25
25 -
26
-
27
-
28
-
29
-
30
-
31
-
32
-
33
-
34
-
35
-
36
-
37
-
38
-
39
-
40
-
41
-
42
-
43
-
44
-
45
-
46
-
47
-
48
-
49
-
50
-
51
-
52
-
53
-
54
-
55
-
56
-
57
-
58
-
59
-
60
-
61
-
62
-
63
-
64
-
65
-
66
-
67
-
68
-
69
-
70
-
71
-
72
-
73
-
74
-
75
-
76
-
77
-
78
-
79
-
80
-
81
-
82
-
83
-
84
-
85
-
86
-
87
-
88
-
89
-
90
-
91
-
92
-
93
-
94
-
95
-
96
-
97
-
98
-
99
-
100
-
101
-
102
-
103
-
104
-
105
-
106
-
107
-
108
-
109
-
110
-
111
-
112
-
113
-
114
-
115
-
116
-
117
-
118
-
119
-
120
-
121
-
122
-
123
-
124
-
125
-
126
-
127
-
128
-
129
-
130
-
131
-
132
-
133
-
134
-
135
-
136
 |
 |
