JVC GY-HM600U GY-HM600U Instruction Manual (135 pages) - Page 36
Assigning Functions to User Buttons, Tally Lamp
 |
View all JVC GY-HM600U manuals
Add to My Manuals
Save this manual to your list of manuals |
Page 36 highlights
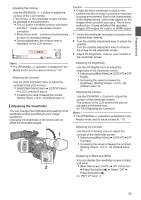
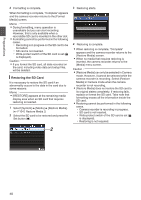
Preparations Assigning Functions to User Buttons You can assign functions to the following buttons and use them as user buttons. By assigning functions to the buttons, the usability of the camera recorder is enhanced. Perform settings in the menu items corresponding to each button. Button [FOCUS ASSIST/1] Button Menu Item [USER1] [OIS/2] Button [USER2] [LOLUX/3] Button [USER3] [AE LOCK/4] Button [USER4] [ZEBRA/5] Button [USER5] [MARKER/6] Button [USER6] [C.REVIEW/7] Button LCD Cross-Shaped Button (J) LCD Cross-Shaped Button (K) LCD Cross-Shaped Button (H) LCD Cross-Shaped Button (I) [USER7] [LCD KEY▲] [LCD KEY▼] [LCD KEY◀] [LCD KEY▶] Tally Lamp This is the indicator lamp for recording and warning. The operation changes according to the menu settings. The lamp blinks when the battery or remaining space on the SD card is low. (Camera mode only) * Set using [Tally Lamp] in the [Main Menu] B [System] menu. (A P104 [ Tally Lamp ] ) TIME CODE C.REVIEW/7 MENU/THUMB CANCEL FOCUS ASSIST/1 OIS / 2 LOLUX / 3 AE LOCK/4 ZEBRA/5 MARKER/6 TIME CODE . 1 Assign functions to the buttons from the menu. Set items in [Main Menu] B [Camera Function] B [User Switch Set] B [USER1][USER7], [LCD KEY▲], [LCD KEY▶], [LCD KEY▼], [LCD KEY◀]. (A P91 [User Switch Set Item] ) Memo : 0 Operations of the user buttons are interlocked with the menu settings. 0 When the menu screen is displayed, these buttons function as the menu operation buttons. (A P86 [Basic Operations in Menu Screen] ) . Menu setting [Tally Lamp] Functional information Warning Caution Recording status Recording Special recording * R : Lights up J : Blinks four times in 1 second o : Blinks once in 1 second Off On -J -o -R -R * Paused state during special recording ([Clip Continuous]). (A P73 [Clip Continuous Rec] ) Memo : 0 Blinking takes priority over lighting up. 36
-
 1
1 -
2
-
3
-
4
-
5
-
6
-
7
-
8
-
9
-
10
-
11
-
12
-
13
-
14
-
15
-
16
-
17
-
18
-
19
-
20
-
21
-
22
-
23
-
24
-
25
-
26
-
27
-
28
-
29
-
30
-
 31
31 -
 32
32 -
 33
33 -
 34
34 -
 35
35 -
 36
36 -
 37
37 -
 38
38 -
 39
39 -
 40
40 -
 41
41 -
42
-
43
-
44
-
45
-
46
-
47
-
48
-
49
-
50
-
51
-
52
-
53
-
54
-
55
-
56
-
57
-
58
-
59
-
60
-
61
-
62
-
63
-
64
-
65
-
66
-
67
-
68
-
69
-
70
-
71
-
72
-
73
-
74
-
75
-
76
-
77
-
78
-
79
-
80
-
81
-
82
-
83
-
84
-
85
-
86
-
87
-
88
-
89
-
90
-
91
-
92
-
93
-
94
-
95
-
96
-
97
-
98
-
99
-
100
-
101
-
102
-
103
-
104
-
105
-
106
-
107
-
108
-
109
-
110
-
111
-
112
-
113
-
114
-
115
-
116
-
117
-
118
-
119
-
120
-
121
-
122
-
123
-
124
-
125
-
126
-
127
-
128
-
129
-
130
-
131
-
132
-
133
-
134
-
135
-
136
 |
 |
