JVC SR-VD400US Instruction Manual - Page 17
Enter cable box brand, Engage test mode, Return to normal screen, NOTES
 |
View all JVC SR-VD400US manuals
Add to My Manuals
Save this manual to your list of manuals |
Page 17 highlights
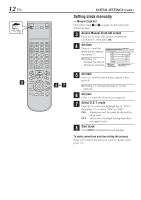
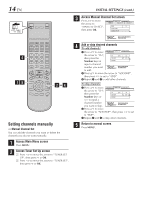
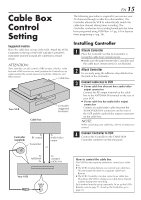
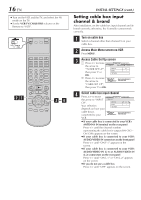
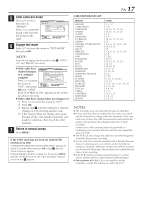
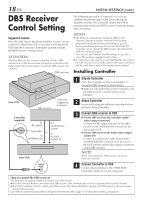
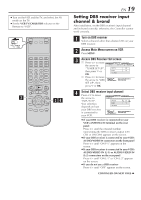
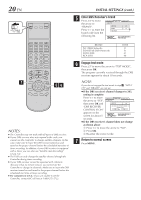
5 Enter cable box brand Press %fi to move the arrow to "BRAND". Press @ # to enter the brand code from the list shown to the right. FUNCTION SET UP TUNER SET UP CABLE SET UP INITIAL SET UP INPUT CH OFF BRAND 1 TEST MODE MENU EXIT OK SELECT WITH ARROW KEYS SELECT THEN PRESS [OK] 6 Engage test mode Press %fi to move the arrow to "TEST MODE", then press OK. NOTE: If you do not engage the test mode in step 6, "INPUT CH" and "BRAND" are not set. ● If the cable box's channel changes to 9, setting is complete Press @ # to move FUNCTION SET UP TUNER SET UP CABLE SET UP INITIAL SET UP INPUT CH OFF BRDAIDNDYOUR CABLE BOX CHANGE1 TO TEST MODE CHANNEL 09? YES NO the arrow to MENU OK SELECT WITH ARROW KEYS "YES", then press EXIT SELECT THEN PRESS [OK] OK and "CABLE BOX CONTROL IS ON" appears on the screen for about 5 seconds. ● If the cable box's channel does not change to 9 1 Press @ # to move the arrow to "NO". 2 Press OK. 3 Repeat step 5 until the cable box's channel 4 changes to 9 by entering another code. If the channel does not change after going through all the code numbers listed for your model of cable box, then try all the other numbers. 7 Return to normal screen Press MENU. If the VCR's clock has not been set (with AUTO CLOCK set to ON) "CABLE BOX USERS SET CLOCK MANUALLY" appears for about 5 seconds when you press OK in step 3, then the Clock Set screen appears. Perform Manual Clock Set on page 12. If you press MENU after the clock has been set, the Cable Box Input Channel screen in step 4 appears. CABLE BOX BRAND LIST BRAND ARCHER CABLETENNA CABLEVIEW CITIZEN CURTIS DIAMOND GC BRAND GEMINI GENERAL INSTRUMENTS HAMLIN JASCO JERROLD NOVAVISION OAK PANASONIC PULSER RCA REGAL REMBRANDT SAMSUNG SCIENTIFIC ATLANTA SIGMA SL MARX SPRUCER STARGATE TELEVIEW TOCOM UNIKA UNIVERSAL VIDEOWAY ZENITH EN 17 CODE 1, 5, 17 1, 17 15, 16, 17, 21, 25 15, 16, 17, 21, 25 2, 8 1, 17 15, 16, 17, 21, 25 15 1, 4, 6, 11, 12, 15, 28 10, 18, 23 15 1, 4, 6, 11, 12, 15, 28 2, 8 7, 20 13, 14 15, 16, 17, 21, 25 13, 14 10, 18, 23 1, 16, 17 5, 16, 24 2, 8 7, 20 5, 16, 17, 24, 25 13, 14 5, 15, 16, 17, 21, 24, 25 5, 16, 24 1, 4, 16 1, 17 16, 17, 25 3, 9, 22 3, 9, 22 NOTES: ● The Controller may not work with all types of cable box. ● If your cable box does not respond to any code, you cannot use the Controller to change cable box channels. In this case, make sure to leave the cable box turned on and tuned to the proper channel before the scheduled start time of timer recording. Contact your cable company about the possibility of exchanging your current cable box with the one compatible with your VCR. ● The VCR can only change the cable box channel through the Controller during timer recording. ● If your cable box cannot be operated with a Remote (because it has no remote sensor), you cannot use the Controller to change its channels. Make sure to leave the cable box turned on and tuned to the proper channel before the scheduled start time of timer recording. ● If the VCR's memory backup expires because of a power failure, set the cable box input channel and brand again. ● For customers in U.S.A.: If you are unable to set the Controller, contact JVC toll free at 1-800-252-5722.
-
 1
1 -
2
-
3
-
4
-
5
-
6
-
7
-
8
-
9
-
10
-
11
-
 12
12 -
 13
13 -
 14
14 -
 15
15 -
 16
16 -
 17
17 -
 18
18 -
 19
19 -
 20
20 -
 21
21 -
 22
22 -
23
-
24
-
25
-
26
-
27
-
28
-
29
-
30
-
31
-
32
-
33
-
34
-
35
-
36
-
37
-
38
-
39
-
40
-
41
-
42
-
43
-
44
-
45
-
46
-
47
-
48
-
49
-
50
-
51
-
52
-
53
-
54
-
55
-
56
-
57
-
58
-
59
-
60
-
61
-
62
-
63
-
64
-
65
-
66
-
67
-
68
-
69
-
70
-
71
-
72
-
73
-
74
-
75
-
76
-
77
-
78
-
79
-
80
-
81
-
82
-
83
-
84
-
85
-
86
-
87
-
88
-
89
-
90
-
91
-
92
 |
 |