JVC SR-VD400US Instruction Manual - Page 75
Recording, Timer Recording, Corrective Action, Possible Cause, Symptom
 |
View all JVC SR-VD400US manuals
Add to My Manuals
Save this manual to your list of manuals |
Page 75 highlights
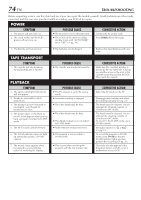
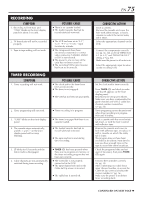
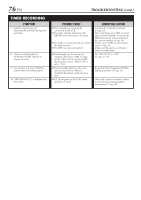
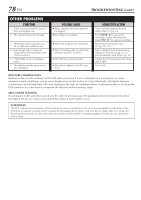
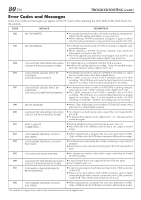
RECORDING SYMPTOM 1. Recording will not start, and "CASS" blinks on the front display panel for about 5 seconds. POSSIBLE CAUSE ● There is no cassette loaded. ● The loaded cassette has had its record safety tab removed. 2. TV broadcasts will not be recorded properly. 3. Tape-to-tape editing will not work. TIMER RECORDING SYMPTOM 1. Timer recording will not work. ● The VCR has been set to "L-1", "L-2", "F-1" or "I-1 etc." input location by mistake. ● The components have been incorrectly connected, or correct video connector (S VIDEO, VIDEO or DV) is not selected. ● The power to one or more of the units has not been turned on. ● The recording VCR's input location has been set incorrectly. POSSIBLE CAUSE ● The clock and/or the timer have been set incorrectly. ● The timer is not engaged. ● The VCR has not been set up properly. 2. Timer programing will not work. ● Timer recording is in progress. 3. "CASS" blinks on the front display panel. 4. The cassette stops automatically, and ‰, Q and $ on the front display panel will not stop blinking. ● The timer is engaged but there is no cassette loaded. ● The loaded cassette has had its record safety tab removed. ● The tape reaches its end during timer recording. 5. ‰ blinks for 10 seconds and the timer mode is disengaged. 6. Cable channels are not automatically switched during timer recording. ● TIMER (‰) has been pressed when there are no programs in memory, or the timer recording program has not been set correctly. ● The Controller is not properly connected to the VCR. ● The input channel selected on the Cable Set Up screen is incorrect. ● The cable box is turned off. EN 75 CORRECTIVE ACTION Insert a cassette. Remove the cassette and cover the hole with adhesive tape, or load a cassette on which the record safety tab is intact. Select the appropriate channel on the VCR. Connect the components correctly (੬ pg. 66, 68) or check "REAR AUX L-1 (or L-2)" and "FRONT AUX F-1" setting (੬ pg. 58). Make sure the power to all units is on. Select the appropriate input location on the recording VCR. CORRECTIVE ACTION Set the clock and/or timer correctly. Press TIMER (‰) and check to make sure that ‰ appears on the front display panel. Re-perform the set-up procedures. Make sure you have compensated for guide channel and VCR or cable box channel number mismatches (੬ pg. 36). Timer programing cannot be performed when timer recording is in progress. Wait until it finishes. Load a cassette with the record safety tab intact, or with the hole covered with adhesive tape. Remove the cassette and cover its hole with adhesive tape, or replace it with a cassette on which the safety tab is intact. The program may not have been recorded in its entirety. Next time be sure you have enough time on the tape to record the entire broadcast. Check the programed data and set again if necessary, then press TIMER (‰) again. Connect the Controller correctly (੬ pg. 15). After confirming your cable box's input channel number, re-access the Cable Set Up screen and select the correct number (੬ pg. 16). Make sure the power is on before timer recording starts. CONTINUED ON NEXT PAGE \
-
 1
1 -
2
-
3
-
4
-
5
-
6
-
7
-
8
-
9
-
10
-
11
-
12
-
13
-
14
-
15
-
16
-
17
-
18
-
19
-
20
-
21
-
22
-
23
-
24
-
25
-
26
-
27
-
28
-
29
-
30
-
31
-
32
-
33
-
34
-
35
-
36
-
37
-
38
-
39
-
40
-
41
-
42
-
43
-
44
-
45
-
46
-
47
-
48
-
49
-
50
-
51
-
52
-
53
-
54
-
55
-
56
-
57
-
58
-
59
-
60
-
61
-
62
-
63
-
64
-
65
-
66
-
67
-
68
-
69
-
 70
70 -
 71
71 -
 72
72 -
 73
73 -
 74
74 -
 75
75 -
 76
76 -
 77
77 -
 78
78 -
 79
79 -
 80
80 -
81
-
82
-
83
-
84
-
85
-
86
-
87
-
88
-
89
-
90
-
91
-
92
 |
 |
