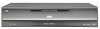
JVC SR-VD400US Instruction Manual - Page 27
S-VHS/VHS Recording, Load a cassette, Select recording channel, Set recording speed, Start recording
 |
View all JVC SR-VD400US manuals
Add to My Manuals
Save this manual to your list of manuals |
Page 27 highlights
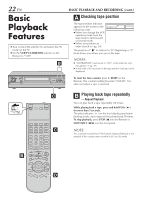
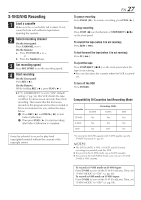
S-VHS/VHS Recording 1 Load a cassette Make sure the record safety tab is intact. If not, cover the hole with adhesive tape before inserting the cassette. 2 Select recording channel On the front panel: Press CHANNEL + or -. On the Remote: a- Press TV/VCR CH + or -. or b- Press the Number keys. 3 Set recording speed Press REC SPEED to set the recording speed. 4 Start recording On the front panel: Press REC ( ¶ ). On the Remote: While holding REC ( ¶ ), press PLAY ( 3 ). ● If "V. CALIBRATION" is set to "ON" (default setting: ੬ pg. 56), this VCR checks the tape condition for about seven seconds, then starts recording. This means that the first seven seconds of the program will not be recorded. If this is inconvenient for you, follow the steps below: 1 Press REC ( ¶ ) and PAUSE ( 8 ) to start Video Calibration. 2 Then press PLAY ( 3 ) to start recording after Video Calibration is complete. It may be unlawful to record or play back copyrighted material without the consent of the copyright owner. EN 27 To pause recording Press PAUSE ( 8 ). To resume recording, press PLAY ( 3 ). To stop recording Press STOP ( 7 ) on the Remote or STOP/EJECT ( 7/0 ) on the front panel. To rewind the tape (when it is not running) Press REW ( 1 ). To fast-forward the tape (when it is not running) Press FF ( ¡ ). To eject the tape Press STOP/EJECT ( 7/0 ) on the front panel when the tape is not running. ● You can also eject the cassette when the VCR is turned off. To turn off the VCR Press POWER. Compatibility Of Cassettes And Recording Mode Cassette D-VHS S-VHS VHS Recording Mode D-VHS S-VHS VHS Yes Yes Yes No Yes Yes No Yes* Yes * To record on the VHS cassette with S-VHS quality, use the S-VHS ET function (੬ pg. 61). NOTES: ● The D-VHS (MTP), S-VHS, S-VHS ET and VHS mode recordings are possible with this VCR. ● To record in the D-VHS mode, use a D-VHS cassette. ● To record in the S-VHS/VHS mode, you can use a D-VHS, S-VHS or VHS cassette. To record in S-VHS mode on D-VHS tapes: Press D-VHS to turn off the D-VHS indicator. Then, set "S-VHS MODE" to "ON" (੬ pg. 60). To record in VHS mode on D-VHS tapes: Press D-VHS to turn off the D-VHS indicator. Then, set "S-VHS MODE" to "OFF" (੬ pg. 60).
-
 1
1 -
2
-
3
-
4
-
5
-
6
-
7
-
8
-
9
-
10
-
11
-
12
-
13
-
14
-
15
-
16
-
17
-
18
-
19
-
20
-
21
-
 22
22 -
 23
23 -
 24
24 -
 25
25 -
 26
26 -
 27
27 -
 28
28 -
 29
29 -
 30
30 -
 31
31 -
 32
32 -
33
-
34
-
35
-
36
-
37
-
38
-
39
-
40
-
41
-
42
-
43
-
44
-
45
-
46
-
47
-
48
-
49
-
50
-
51
-
52
-
53
-
54
-
55
-
56
-
57
-
58
-
59
-
60
-
61
-
62
-
63
-
64
-
65
-
66
-
67
-
68
-
69
-
70
-
71
-
72
-
73
-
74
-
75
-
76
-
77
-
78
-
79
-
80
-
81
-
82
-
83
-
84
-
85
-
86
-
87
-
88
-
89
-
90
-
91
-
92
 |
 |
