JVC SR-VD400US Instruction Manual - Page 69
Set PICTURE CONTROL to EDIT, Load a cassette
 |
View all JVC SR-VD400US manuals
Add to My Manuals
Save this manual to your list of manuals |
Page 69 highlights
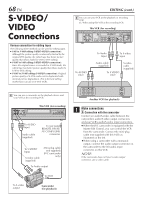
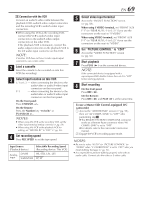
B Connection with the VCR Connect an audio/S-video cable between the playback VCR's audio/S-video output connectors and the recording VCR's audio/S-video input connectors. ● When using this VCR as the recording VCR, connect this VCR's audio/S-video input connectors to the audio/S-video output connectors on the other VCR. If the playback VCR is monaural, connect the audio output connector on the playback VCR to the left audio input connector on this VCR. NOTE: If another VCR does not have S-video input/output connectors, use a video cable. 2 Load a cassette Insert the cassette to be recorded on into this VCR (for recording). 3 Select input location on this VCR L-1 or L-2 - when connecting the device to the audio/video or audio/S-video input connectors on the rear panel. F-1 - when connecting the device to the audio/video or audio/S-video input connectors on the front panel. On the front panel: Press CHANNEL +/-. On the Remote: Press the Number key "0 (AUX)" or TV/VCR CH +/-. NOTES: ● When using this VCR as the recording VCR, set the video input terminal setting correctly (੬ pg. 58). ● When using this VCR as the playback VCR for editing, set "DIGITAL R3" to "OFF" (੬ pg. 56). 4 Set recording speed Press REC SPEED to set the tape speed. Input Source (Playback device) Analog D-VHS input S-VHS/VHS Selectable Recording Speed (Recording device: This VCR) HS, STD, LS3, LS5 SP, EP EN 69 5 Select video input terminal Access the "IN/OUT FUNCTION" screen (੬ pg. 58). When using S VIDEO terminal, set "FRONT AUX F-1" (or "REAR AUX L-1 (or L-2)" if you use the connectors on the rear) to "S-VIDEO". When using VIDEO terminal, set "FRONT AUX F-1" (or "REAR AUX L-1 (or L-2)" if you use the connectors on the rear) to "VIDEO". 6 Set "PICTURE CONTROL" to "EDIT" Access the "VIDEO FUNCTION" screen (੬ pg. 56). 7 Start playback Press PLAY ( 3 ) on the connected device. NOTE: If the connected device is equipped with a superimpose/OSD disable feature then set it to "OFF" before starting playback. 8 Start recording On the front panel: Press REC ( ¶ ). On the Remote: Press REC ( ¶ ) and PLAY ( 3 ) at the same time. To use a Master Edit Control-equipped JVC 1camcorder Access the "ADDITIONAL" screen (੬ pg. 59), then set "AV COMPU-LINK" to "OFF" after performing step 6. ● The REMOTE PAUSE/AV COMPULINK connector works as a Remote Pause connector when "AV COMPU-LINK" is set to "OFF" ● For details, refer to the camcorder's instruction 2 manual. Engage the VCR's recording pause mode. NOTES: ● Be sure to select "AUTO" for "PICTURE CONTROL" (or "NORM" when "V. CALIBRATION" is set to "OFF") after you finish dubbing the tapes (੬ pg. 56). ● It is impossible to perform dubbing properly only with an audio cable. Connect also the video or S-video cable.
-
 1
1 -
2
-
3
-
4
-
5
-
6
-
7
-
8
-
9
-
10
-
11
-
12
-
13
-
14
-
15
-
16
-
17
-
18
-
19
-
20
-
21
-
22
-
23
-
24
-
25
-
26
-
27
-
28
-
29
-
30
-
31
-
32
-
33
-
34
-
35
-
36
-
37
-
38
-
39
-
40
-
41
-
42
-
43
-
44
-
45
-
46
-
47
-
48
-
49
-
50
-
51
-
52
-
53
-
54
-
55
-
56
-
57
-
58
-
59
-
60
-
61
-
62
-
63
-
 64
64 -
 65
65 -
 66
66 -
 67
67 -
 68
68 -
 69
69 -
 70
70 -
 71
71 -
 72
72 -
 73
73 -
 74
74 -
75
-
76
-
77
-
78
-
79
-
80
-
81
-
82
-
83
-
84
-
85
-
86
-
87
-
88
-
89
-
90
-
91
-
92
 |
 |