JVC SR-VD400US Instruction Manual - Page 78
Other Problems
 |
View all JVC SR-VD400US manuals
Add to My Manuals
Save this manual to your list of manuals |
Page 78 highlights
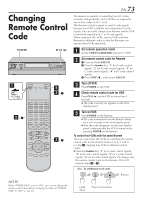
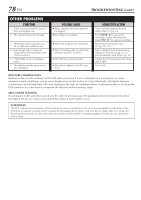
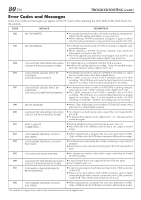
78 EN TROUBLESHOOTING (cont.) OTHER PROBLEMS SYMPTOM 1. When scanning channels, some of them are skipped over. 2. The channel cannot be changed. 3. The Remote will not operate your TV or cable box or DBS receiver. 4. Even though Auto or Semiauto Clock Set has been performed, the clock is incorrect. 5. "PM" blinks on the front display panel. 6. The subtitles and the menu screen are overlapped. POSSIBLE CAUSE ● Those channels have been preset to be skipped. ● Recording is in progress. ● The brand codes are set incorrectly. ● The clock setting data received from the host channel is incorrect. ● The VCR do not work properly. ● The subtitle display on the TV is set to on. CORRECTIVE ACTION If you need the skipped channels, restore them (੬ pg. 14). Press PAUSE ( 8 ) to pause the recording, change channels, then press PLAY ( 3 ) to resume recording. Reset the correct brand codes (੬ pg. 70 - 72 ). Select a different host channel during Semiauto Clock Set (੬ pg. 11), or perform Manual Clock Set (੬ pg. 12). Unplug the AC power plug once, then plug it again. Set it to off. MOISTURE CONDENSATION Moisture in the air will condense on the VCR when you move it from a cold place to a warm place, or under extremely humid conditions-just as water droplets form on the surface of a glass filled with cold liquid. Moisture condensation on the head drum will cause damage to the tape. In conditions where condensation may occur, keep the VCR turned on for a few hours to evaporate the moisture before inserting a tape. ABOUT HEAD CLEANING Accumulation of dirt and other particles on the video heads may cause the playback picture to become blurred or interrupted. Be sure to contact your nearest JVC dealer if such troubles occur. ATTENTION This VCR contains microcomputers. External electronic noise or interference can cause microcomputer to malfunction. If the VCR does not operate correctly switch its power off and unplug the AC power cord from the AC supply. Wait for a while and then plug the power back in. Eject and check the condition of the cassette. If everything appears normal, you can operate the VCR as usual.
-
 1
1 -
2
-
3
-
4
-
5
-
6
-
7
-
8
-
9
-
10
-
11
-
12
-
13
-
14
-
15
-
16
-
17
-
18
-
19
-
20
-
21
-
22
-
23
-
24
-
25
-
26
-
27
-
28
-
29
-
30
-
31
-
32
-
33
-
34
-
35
-
36
-
37
-
38
-
39
-
40
-
41
-
42
-
43
-
44
-
45
-
46
-
47
-
48
-
49
-
50
-
51
-
52
-
53
-
54
-
55
-
56
-
57
-
58
-
59
-
60
-
61
-
62
-
63
-
64
-
65
-
66
-
67
-
68
-
69
-
70
-
71
-
72
-
 73
73 -
 74
74 -
 75
75 -
 76
76 -
 77
77 -
 78
78 -
 79
79 -
 80
80 -
 81
81 -
 82
82 -
 83
83 -
84
-
85
-
86
-
87
-
88
-
89
-
90
-
91
-
92
 |
 |