KitchenAid KSC700SS Instructions and Recipes - Page 8
Preparing the Slow Cooker for Use, Operating the Slow Cooker and, Programmable Timer
 |
UPC - 883049012742
View all KitchenAid KSC700SS manuals
Add to My Manuals
Save this manual to your list of manuals |
Page 8 highlights
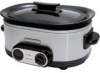
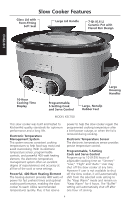
ENGLISH Preparing the Slow Cooker for Use Before First Use Before using your slow cooker for the first time, wipe the metal housing and cord with a clean, damp cloth. Wash the ceramic pot and glass lid in hot soapy water, then rinse and dry. The silicon lid seal at the edge of the glass is removable and should be washed individually. The ceramic pot, glass lid and silicon lid seal can also be washed in the dishwasher. Slow Cooker Assembly 1. Place the ceramic pot in the metal housing. Do not cook anything in the metal housing. Avoid sudden temperature changes such as adding refrigerated foods into heated pot. The ceramic pot must be placed in the metal housing, and food placed in the ceramic pot for cooking. 2. Plug into a grounded 3-prong outlet. Slow cooker is now ready for operation. Operating the Slow Cooker and Programmable Timer The KitchenAid® slow cooker provides an unparalleled level of ver satility and control through its programmable control panel, which consists of a: 1. Programmable, 5-Setting Cook And Serve Control, 2. "Cooking" and "Keep Warm" LED lights, 3. 10-Hour Cooking Time Display, and 4. "-" and "+" Time-Adjustment buttons. The "Cooking" and "Keep Warm" LED lights. These two indicator lights show when the slow cooker is operating in any one of the four "Cooking" modes or in the "Keep Warm" mode. The "Cooking" indicator light turns on when the cook and serve control is set to either "Simmer," Low," "High" or "Auto." This light is off when either the digital timer counts down to 0:00, or when the cook and serve control is set to "Buffet." The display and lights remain off until the cook and serve control is turned from "Off" to one of the four cook settings. 10-Hour Cooking Time Display The 10-hour cooking time display defaults and shows 9 hours and 59 minutes of time remaining of cooking on the "Simmer," "Low," and "Auto" temperature settings, and 8 hours of time on the "High" temperature setting. The display immediately begins counting down from the moment the unit is plugged in and the temperature dial is set. Once the timer display counts down to "0:00," the display will show "End." If the display shows an error code, then refer to the "Troubleshooting" section. 6
-
 1
1 -
2
-
 3
3 -
 4
4 -
 5
5 -
 6
6 -
 7
7 -
 8
8 -
 9
9 -
 10
10 -
 11
11 -
 12
12 -
 13
13 -
14
-
15
-
16
-
17
-
18
-
19
-
20
-
21
-
22
-
23
-
24
-
25
-
26
-
27
-
28
-
29
-
30
-
31
-
32
-
33
-
34
-
35
-
36
-
37
-
38
-
39
-
40
-
41
-
42
-
43
-
44
-
45
-
46
-
47
-
48
-
49
-
50
-
51
-
52
-
53
-
54
-
55
-
56
-
57
-
58
-
59
-
60
-
61
-
62
-
63
-
64
-
65
-
66
-
67
-
68
-
69
-
70
-
71
-
72
-
73
-
74
-
75
-
76
-
77
-
78
-
79
-
80
-
81
-
82
-
83
-
84
-
85
-
86
-
87
-
88
-
89
-
90
-
91
-
92
 |
 |
