Konica Minolta AccurioPress C14000 Watkiss PowerSquare R2L User Manual - Page 14
Procedure for a New Job, Action, Information
 |
View all Konica Minolta AccurioPress C14000 manuals
Add to My Manuals
Save this manual to your list of manuals |
Page 14 highlights
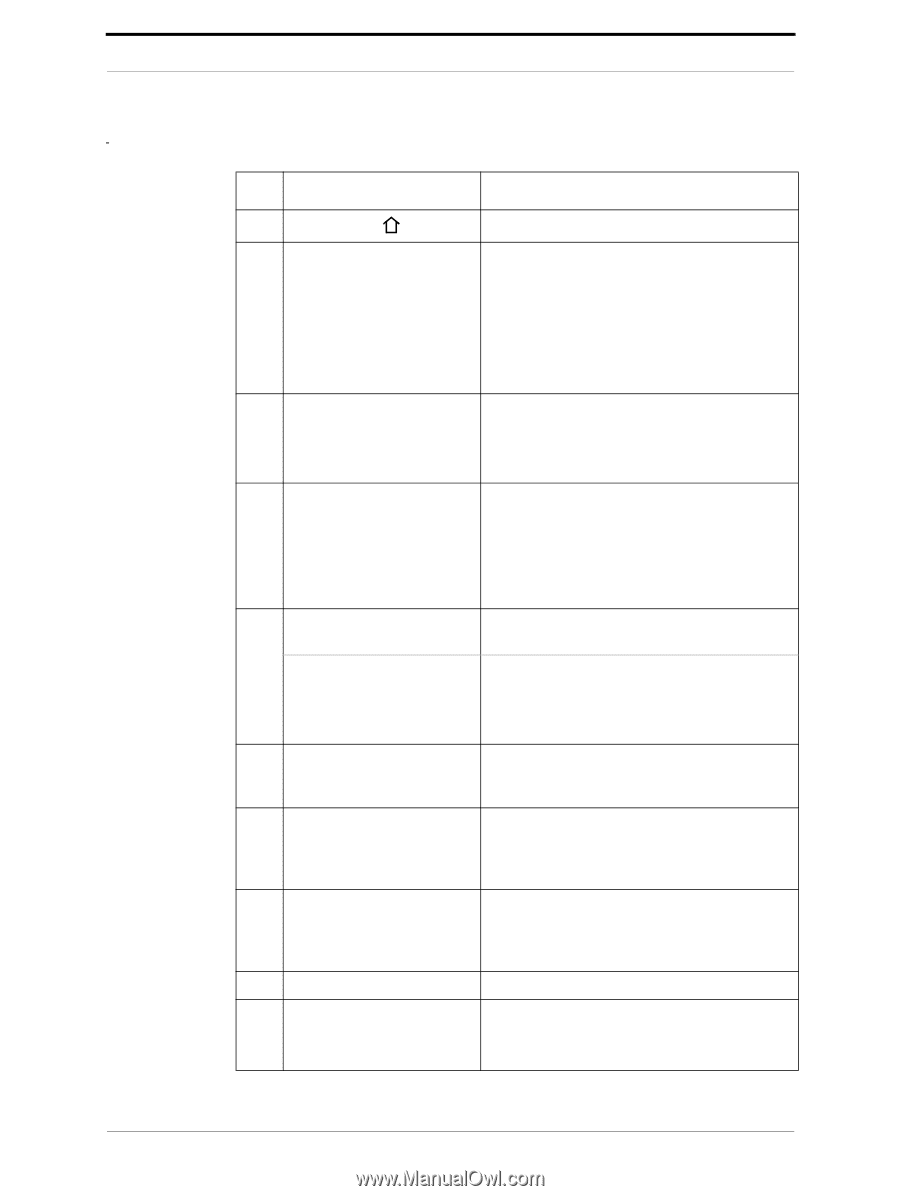
2 - How to Run the PowerSquare - Enter the Job Settings Procedure for a New Job Step Action Information 1 Touch BASIC . 2 Enter the paper size. Touch PAPER SIZE. Enter the dimensions of the paper. The job setting is easier if you first select a preset paper size, then adjust the settings as necessary. Touch PAPER SIZE > PRESETS > A3 or A4. (USA: 11x17, 8.5x11 or 8.5x14) 3 Enter the page direction. Touch PAGE DIRECTION > LANDSCAPE or PORTRAIT. If the PAGE DIRECTION option is not available, the PAGE DIRECTION cannot be changed. 4 Enter the page rotation set- For A4 paper size, the normal setting for ting. ROTATE is ON. Rotation lets the printer oper- ate at optimum speed. Touch ROTATE to turn the sheet rotation ON or OFF. Always select the page direction before you change the rotate setting. 5 Enter the sheet thickness Touch SET THICKNESS. Set AUTO to ON. Use or '+' or ' - ' to enter the SHEET THICKNESS. Enter the set thickness. See "Set Thickness and Sheet Thickness" on page 8. Touch SET THICKNESS. Set AUTO to OFF. Use '+' or ' - ' to enter the SET THICKNESS. 6 Enter the number of stitches. Touch STITCHES and enter the number of stitches. If needed, the stitch pitch can be changed. See "STITCH PITCH" on page 18. 7 Enter the spine form set- The spine form setting is automatic, accord- ting. ing to the SET THICKNESS setting. If needed, the setting can be changed. See "FORM" on page 19 8 Enter the trim setting. The trim setting is automatic, according to the PAGE SIZE and SET THICKNESS settings. To change the setting, touch TRIM. See "TRIM" on page 19 9 Touch CLOSE. 10 If needed, save the job set- If the same job settings are used frequently, tings to memory. then save the job settings to memory. See "Save a job" on page 26. 10 Watkiss PowerSquare™224 User Manual
-
 1
1 -
2
-
3
-
4
-
5
-
6
-
7
-
8
-
 9
9 -
 10
10 -
 11
11 -
 12
12 -
 13
13 -
 14
14 -
 15
15 -
 16
16 -
 17
17 -
 18
18 -
 19
19 -
20
-
21
-
22
-
23
-
24
-
25
-
26
-
27
-
28
-
29
-
30
-
31
-
32
-
33
-
34
-
35
-
36
-
37
-
38
-
39
-
40
-
41
-
42
-
43
-
44
-
45
-
46
-
47
-
48
-
49
-
50
-
51
-
52
-
53
-
54
-
55
-
56
-
57
-
58
-
59
-
60
-
61
-
62
-
63
-
64
-
65
-
66
-
67
-
68
-
69
-
70
-
71
-
72
-
73
-
74
-
75
-
76
-
77
-
78
-
79
-
80
-
81
-
82
-
83
-
84
-
85
-
86
-
87
-
88
-
89
-
90
-
91
-
92
-
93
-
94
-
95
-
96
-
97
-
98
-
99
-
100
-
101
-
102
-
103
-
104
-
105
-
106
-
107
-
108
-
109
-
110
-
111
-
112
-
113
-
114
 |
 |