Konica Minolta AccurioPress C14000 Watkiss PowerSquare R2L User Manual - Page 28
The MENU Window, The MENU Window Buttons
 |
View all Konica Minolta AccurioPress C14000 manuals
Add to My Manuals
Save this manual to your list of manuals |
Page 28 highlights
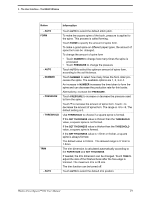
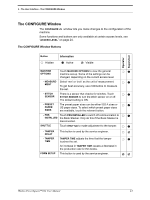
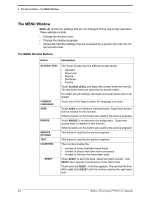
3 - The User Interface - The MENU Window The MENU Window MENU shows the settings that are not changed during day-to-day operation. These settings include • Change the Access Level • Change the display language • Advanced machine settings that are accessed by a person who has the cor- rect access-code. The MENU Window Buttons Button Information ACCESS LEVEL CURRENT LANGUAGE AXES BRIDGE SERVICE OPTIONS TEST COUNTERS - RESET The Touch Screen has five different access levels • Operator • Supervisor • Service • Distributor • Factory Touch ACCESS LEVEL and select the correct level from the list. The last three levels are protected by access codes. To protect the job settings, the supervisor level allows jobs to be locked. Touch one of the flags to select the language you need. Touch AXES to re-reference individual axes. Supervisor access level is needed for this function. Other functions on this button are used by the service engineer. Touch BRIDGE to re-reference the bridge axes. Supervisor access level is needed for this function. Other functions on this button are used by the service engineer. This button is used by the service engineer. This button is used by the service engineer. The counters display the • number of books that have been made • number of sheets that have been processed • number of stitches that have been used Touch RESET to zero the book, sheet and stitch counter. Use RESET after operator maintenance to the stitch head. Touch and hold RESET. A red line appears. The red line fills from left to right. Hold RESET until the red line reaches the right-hand side. 24 Watkiss PowerSquare™224 User Manual
-
 1
1 -
2
-
3
-
4
-
5
-
6
-
7
-
8
-
9
-
10
-
11
-
12
-
13
-
14
-
15
-
16
-
17
-
18
-
19
-
20
-
21
-
22
-
 23
23 -
 24
24 -
 25
25 -
 26
26 -
 27
27 -
 28
28 -
 29
29 -
 30
30 -
 31
31 -
 32
32 -
 33
33 -
34
-
35
-
36
-
37
-
38
-
39
-
40
-
41
-
42
-
43
-
44
-
45
-
46
-
47
-
48
-
49
-
50
-
51
-
52
-
53
-
54
-
55
-
56
-
57
-
58
-
59
-
60
-
61
-
62
-
63
-
64
-
65
-
66
-
67
-
68
-
69
-
70
-
71
-
72
-
73
-
74
-
75
-
76
-
77
-
78
-
79
-
80
-
81
-
82
-
83
-
84
-
85
-
86
-
87
-
88
-
89
-
90
-
91
-
92
-
93
-
94
-
95
-
96
-
97
-
98
-
99
-
100
-
101
-
102
-
103
-
104
-
105
-
106
-
107
-
108
-
109
-
110
-
111
-
112
-
113
-
114
 |
 |
