Konica Minolta C83hc High Chroma AccurioPress C6100/C6085 AccurioPress C3080/C - Page 18
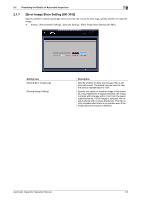
ence Image for Automatic Inspection in this manual. Select [Use Registered Image] in [Reference Im
 |
View all Konica Minolta C83hc High Chroma manuals
Add to My Manuals
Save this manual to your list of manuals |
Page 18 highlights
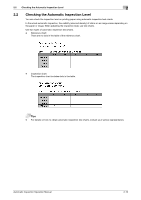
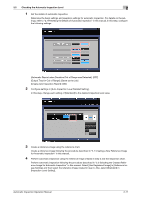
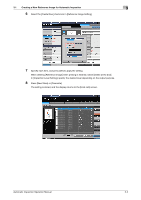
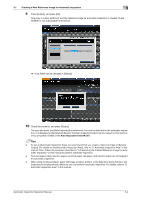
2.2 Checking the Automatic Inspection Level 2 1 Set the details of automatic inspection. Determine the basic settings and operation settings for automatic inspection. For details on the settings, refer to "2.1 Presetting the Details of Automatic Inspection" in this manual. In this step, configure the following settings. [Automatic Reprint when Deviation/Out of Range was Detected]: [OFF] [Output Tray for Out of Range]: [Same as the Job] [Create Auto Inspection Report]: [ON] 2 Configure settings in [Auto Inspection Level Detailed Setting]. In this step, change each setting of [Standard] to the desired inspection level value. 3 Create a reference image using the reference chart. Create a reference image following the procedure described in "3.1 Creating a New Reference Image for Automatic Inspection" in this manual. 4 Perform automatic inspection using the reference image created in step 3 and the inspection chart. Perform automatic inspection following the procedure described in "3.2 Selecting the Created Reference Image for Automatic Inspection" in this manual. Select [Use Registered Image] in [Reference Image Setting], and then select the reference image created in step 3. Also, select [Standard] in [Inspection Level Setting]. Automatic Inspection Operation Manual 2-11
-
 1
1 -
2
-
3
-
4
-
5
-
6
-
7
-
8
-
9
-
10
-
11
-
12
-
 13
13 -
 14
14 -
 15
15 -
 16
16 -
 17
17 -
 18
18 -
 19
19 -
 20
20 -
 21
21 -
 22
22 -
 23
23 -
24
-
25
-
26
-
27
-
28
-
29
-
30
-
31
-
32
-
33
-
34
-
35
-
36
-
37
-
38
-
39
-
40
-
41
-
42
-
43
-
44
-
45
-
46
-
47
-
48
-
49
-
50
-
51
-
52
-
53
-
54
-
55
-
56
-
57
-
58
-
59
-
60
-
61
-
62
-
63
-
64
-
65
-
66
-
67
-
68
-
69
-
70
-
71
-
72
-
73
-
74
 |
 |
