Konica Minolta C83hc High Chroma AccurioPress C6100/C6085 AccurioPress C3080/C - Page 51
Back and [Select in each
 |
View all Konica Minolta C83hc High Chroma manuals
Add to My Manuals
Save this manual to your list of manuals |
Page 51 highlights
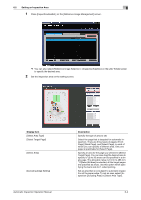
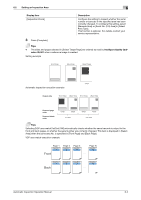
6.2 Setting an Inspection Area 6 1 Press [InspectionAreaSet.] on the [Reference Image Management] screen. % You can also select [Reference Image Selection] - [InspectionAreaSet.] on the [Job Ticket] screen to specify the desired area. 2 Set the inspection area on the setting screen. Display item [Select Area Type] [Select Target Page] [Select Area] [Excluding Edge Setting] Automatic Inspection Operation Manual Description Specify the type of area to set. Select the page that is targeted for automatic inspection. There are three types of pages: [Front Page], [Back Page], and [Select Page], in each of which you can specify a different area. Only one page is specifiable for [Select Page]. Specify an area for the page you selected in [Select Target Page]. You can also drag the desired area to specify it. Up to 30 areas can be specified in a single page. The allowable range is 0 mm to 488 mm. * If [Select All Area] is selected, all the target pages are specified as areas. Use this option when specifying the back side for 1-sided printing. Set an area that is not subject to automatic inspection at the paper edge. To set an area, select [Inspection Excluding Area] in [Select Area Type]. 6-4
-
 1
1 -
2
-
3
-
4
-
5
-
6
-
7
-
8
-
9
-
10
-
11
-
12
-
13
-
14
-
15
-
16
-
17
-
18
-
19
-
20
-
21
-
22
-
23
-
24
-
25
-
26
-
27
-
28
-
29
-
30
-
31
-
32
-
33
-
34
-
35
-
36
-
37
-
38
-
39
-
40
-
41
-
42
-
43
-
44
-
45
-
 46
46 -
 47
47 -
 48
48 -
 49
49 -
 50
50 -
 51
51 -
 52
52 -
 53
53 -
 54
54 -
 55
55 -
 56
56 -
57
-
58
-
59
-
60
-
61
-
62
-
63
-
64
-
65
-
66
-
67
-
68
-
69
-
70
-
71
-
72
-
73
-
74
 |
 |
