Konica Minolta C83hc High Chroma AccurioPress C6100/C6085 AccurioPress C3080/C - Page 23
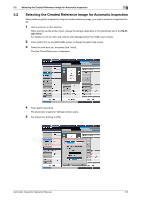
Output]. For details on the [Automatic Inspection Area]
 |
View all Konica Minolta C83hc High Chroma manuals
Add to My Manuals
Save this manual to your list of manuals |
Page 23 highlights
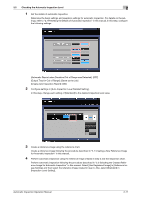
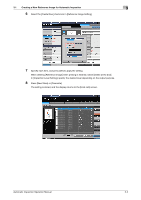
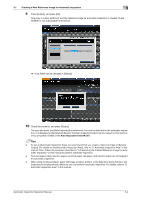
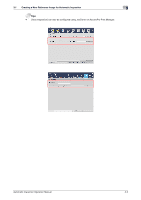
3.1 Creating a New Reference Image for Automatic Inspection 3 9 Press [Output], and press [OK]. One copy is output as [Proof], and the reference image for automatic inspection is created. Check whether or not output paper is erroneous. % A job ticket can be changed in [Setting]. 10 Check the contents, and press [Output]. The print job starts, and [Auto Inspection] is performed. If an error is detected by the automatic inspection, it is displayed in [IQ Detected Result]. The [Auto Inspection] report can be viewed on this machine or by using Web Utilities of the Auto Inspection Unit UK-301. Tips - To set an [Automatic Inspection Area], we recommend that you create a reference image in [Sample Output]. For details on the [Automatic Inspection Area], refer to "6. Automatic Inspection Area" in this manual. Then, follow the procedure described in "3.2 Selecting the Created Reference Image for Automatic Inspection" in this manual to perform automatic inspection. - Textured paper, blank insertion paper, punched paper, tab paper, and insertion paper are not targeted for automatic inspection. - When using numbered paper, paper with page numbers printed, or the date/time stamp function, set Inspection Excluding Area by reference; you can perform automatic inspection. For details, refer to "6. Automatic Inspection Area" in this manual. Automatic Inspection Operation Manual 3-4
-
 1
1 -
2
-
3
-
4
-
5
-
6
-
7
-
8
-
9
-
10
-
11
-
12
-
13
-
14
-
15
-
16
-
17
-
 18
18 -
 19
19 -
 20
20 -
 21
21 -
 22
22 -
 23
23 -
 24
24 -
 25
25 -
 26
26 -
 27
27 -
 28
28 -
29
-
30
-
31
-
32
-
33
-
34
-
35
-
36
-
37
-
38
-
39
-
40
-
41
-
42
-
43
-
44
-
45
-
46
-
47
-
48
-
49
-
50
-
51
-
52
-
53
-
54
-
55
-
56
-
57
-
58
-
59
-
60
-
61
-
62
-
63
-
64
-
65
-
66
-
67
-
68
-
69
-
70
-
71
-
72
-
73
-
74
 |
 |
