Konica Minolta Kodak Scan Station 710 Administration Guide - Page 56
Setting up a email destination, Edit>Destinations, Email, Search, Import
 |
View all Konica Minolta Kodak Scan Station 710 manuals
Add to My Manuals
Save this manual to your list of manuals |
Page 56 highlights
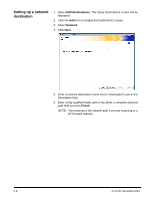
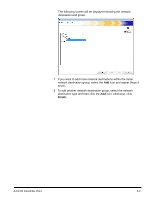
Setting up a email destination 1. Select Edit>Destinations. The Setup Destinations screen will be displayed. 2. Click the Add icon to display the Destinations screen. 3. Select Email. 4. Click Next. 5. Enter a name in the Description field and an email address in the Enter a complete email address field where you want the scanned documents to be sent. • Search allows you to search the network address book for email addresses. Any addresses found while searching can be added to the currently selected email group. NOTES: - The network address book is the one associated with the SMTP server configured under Device Settings (Email server). - If more than 20 addresses are found that match the search criteria, you may want to refine your search by adding more information, such as the first name of the person you are searching; for example, "smith joe" instead of just "smith". - Wildcards can be added before and after the search criteria. - The Search function relies on the Active Directory Server device settings specified to function correctly. See the section entitled, "Configuring Active Directory Settings" in Chapter 4 for more information. • Import allows you to import a CSV file. See the next section entitled, "Importing an email address book" for more information. 6-4 A-61796 December 2013
-
 1
1 -
2
-
3
-
4
-
5
-
6
-
7
-
8
-
9
-
10
-
11
-
12
-
13
-
14
-
15
-
16
-
17
-
18
-
19
-
20
-
21
-
22
-
23
-
24
-
25
-
26
-
27
-
28
-
29
-
30
-
31
-
32
-
33
-
34
-
35
-
36
-
37
-
38
-
39
-
40
-
41
-
42
-
43
-
44
-
45
-
46
-
47
-
48
-
49
-
50
-
 51
51 -
 52
52 -
 53
53 -
 54
54 -
 55
55 -
 56
56 -
 57
57 -
 58
58 -
 59
59 -
 60
60 -
 61
61 -
62
-
63
-
64
-
65
-
66
-
67
-
68
-
69
-
70
-
71
-
72
-
73
-
74
-
75
-
76
-
77
-
78
-
79
-
80
-
81
-
82
-
83
-
84
-
85
-
86
-
87
-
88
-
89
-
90
-
91
-
92
-
93
-
94
-
95
-
96
-
97
-
98
-
99
-
100
-
101
-
102
-
103
-
104
-
105
-
106
-
107
-
108
-
109
-
110
-
111
-
112
-
113
-
114
-
115
-
116
-
117
-
118
-
119
-
120
-
121
-
122
-
123
-
124
-
125
-
126
-
127
-
128
-
129
-
130
-
131
-
132
-
133
-
134
-
135
-
136
-
137
-
138
-
139
-
140
 |
 |
