Konica Minolta Kodak Scan Station 710 Administration Guide - Page 65
Scan Station 700/720EX - Scanner, IP_192.168.2.137., Kodak, share, Address
 |
View all Konica Minolta Kodak Scan Station 710 manuals
Add to My Manuals
Save this manual to your list of manuals |
Page 65 highlights
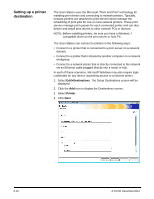
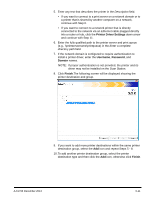
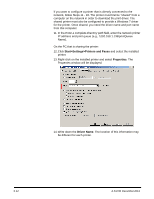
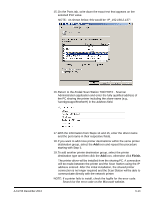
15. On the Ports tab, write down the exact text that appears on the selected Port value. NOTE: As shown below, this would be "IP_192.168.2.137". 16. Return to the Kodak Scan Station 700/720EX - Scanner Administration application and enter the fully qualified address of the PC sharing the printer including the share name (e.g., \\workgrouppc\BrotherH) in the Address field. A-61796 December 2013 17. With the information from Steps 14 and 15, enter the driver name and the port name in their respective fields. 18. If you want to add more printer destinations within the same printer destination group, select the Add icon and repeat this procedure starting with Step 5. 19. To add another printer destination group, select the printer destination type and then click the Add icon, otherwise click Finish. The printer driver will be installed from the sharing PC. A connection will be made between the printer and the Scan Station using the IP address entered. After the initial installation, the shared printer connection is no longer required and the Scan Station will be able to communicate directly with the network printer. NOTE: If a printer fails to install, check the logfile for the error code. Search for the error code on the Microsoft website. 6-13
-
 1
1 -
2
-
3
-
4
-
5
-
6
-
7
-
8
-
9
-
10
-
11
-
12
-
13
-
14
-
15
-
16
-
17
-
18
-
19
-
20
-
21
-
22
-
23
-
24
-
25
-
26
-
27
-
28
-
29
-
30
-
31
-
32
-
33
-
34
-
35
-
36
-
37
-
38
-
39
-
40
-
41
-
42
-
43
-
44
-
45
-
46
-
47
-
48
-
49
-
50
-
51
-
52
-
53
-
54
-
55
-
56
-
57
-
58
-
59
-
 60
60 -
 61
61 -
 62
62 -
 63
63 -
 64
64 -
 65
65 -
 66
66 -
 67
67 -
 68
68 -
 69
69 -
 70
70 -
71
-
72
-
73
-
74
-
75
-
76
-
77
-
78
-
79
-
80
-
81
-
82
-
83
-
84
-
85
-
86
-
87
-
88
-
89
-
90
-
91
-
92
-
93
-
94
-
95
-
96
-
97
-
98
-
99
-
100
-
101
-
102
-
103
-
104
-
105
-
106
-
107
-
108
-
109
-
110
-
111
-
112
-
113
-
114
-
115
-
116
-
117
-
118
-
119
-
120
-
121
-
122
-
123
-
124
-
125
-
126
-
127
-
128
-
129
-
130
-
131
-
132
-
133
-
134
-
135
-
136
-
137
-
138
-
139
-
140
 |
 |
