Konica Minolta bizhub 20 bizhub 20 Network User Guide - Page 122
Using RARP to con the IP address
 |
View all Konica Minolta bizhub 20 manuals
Add to My Manuals
Save this manual to your list of manuals |
Page 122 highlights
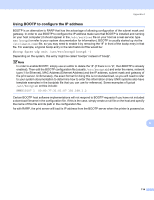
Appendix A Using RARP to configure the IP address A The KONICA MINOLTA print server's IP address can be configured using the Reverse ARP (RARP) facility on your host computer. This is done by editing the /etc/ethers file (if this file does not exist, you can create it) with an entry similar to the following: 00:80:77:31:01:07 KMN008077310107 Where the first entry is the MAC Address (Ethernet Address) of the print server and the second entry is the name of the print server (the name must be the same as the one you put in the /etc/hosts file). If the RARP daemon is not already running, start it (depending on the system the command can be rarpd, rarpd -a, in.rarpd -a or something else; type man rarpd or refer to your system documentation for additional information). To verify that the RARP daemon is running on a Berkeley UNIX based system, type the following command: ps -ax | grep -v grep | grep rarpd For AT&T UNIX-based systems, type: ps -ef | grep -v grep | grep rarpd The KONICA MINOLTA print server will get the IP address from the RARP daemon when the printer is powered on. Using APIPA to configure the IP address A The KONICA MINOLTA print server supports the Automatic Private IP Addressing (APIPA) protocol. With APIPA, DHCP clients automatically configure an IP address and subnet mask when a DHCP server is not available. The device chooses it's own IP address in the range 169.254.1.0 through to 169.254.254.255. The subnet mask is automatically set to 255.255.0.0 and the gateway address is set to 0.0.0.0. By default, the APIPA protocol is enabled. If you want to disable the APIPA protocol, you can disable it using control panel of the machine. (For more information, see APIPA on page 23.) A 115
-
 1
1 -
2
-
3
-
4
-
5
-
6
-
7
-
8
-
9
-
10
-
11
-
12
-
13
-
14
-
15
-
16
-
17
-
18
-
19
-
20
-
21
-
22
-
23
-
24
-
25
-
26
-
27
-
28
-
29
-
30
-
31
-
32
-
33
-
34
-
35
-
36
-
37
-
38
-
39
-
40
-
41
-
42
-
43
-
44
-
45
-
46
-
47
-
48
-
49
-
50
-
51
-
52
-
53
-
54
-
55
-
56
-
57
-
58
-
59
-
60
-
61
-
62
-
63
-
64
-
65
-
66
-
67
-
68
-
69
-
70
-
71
-
72
-
73
-
74
-
75
-
76
-
77
-
78
-
79
-
80
-
81
-
82
-
83
-
84
-
85
-
86
-
87
-
88
-
89
-
90
-
91
-
92
-
93
-
94
-
95
-
96
-
97
-
98
-
99
-
100
-
101
-
102
-
103
-
104
-
105
-
106
-
107
-
108
-
109
-
110
-
111
-
112
-
113
-
114
-
115
-
116
-
 117
117 -
 118
118 -
 119
119 -
 120
120 -
 121
121 -
 122
122 -
 123
123 -
 124
124 -
 125
125 -
 126
126 -
 127
127 -
128
-
129
-
130
-
131
-
132
-
133
-
134
-
135
-
136
-
137
-
138
-
139
-
140
-
141
-
142
-
143
-
144
-
145
 |
 |