Konica Minolta bizhub 20 bizhub 20 Network User Guide - Page 17
Configuring your machine for a network, Overview, IP addresses, subnet masks and gateways - supplies
 |
View all Konica Minolta bizhub 20 manuals
Add to My Manuals
Save this manual to your list of manuals |
Page 17 highlights
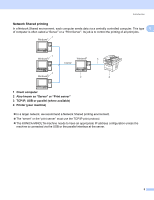
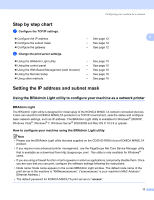
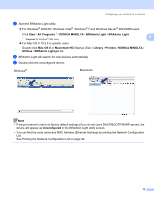
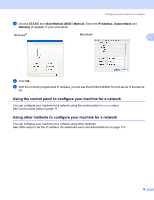
2 Configuring your machine for a network 2 Overview 2 2 Before using your KONICA MINOLTA machine in a network environment, you must install the KONICA MINOLTA software and also configure the appropriate TCP/IP network settings on the machine itself. In this chapter, you will learn the basic steps required to print over the network using TCP/IP protocol. We recommend that you use the KONICA MINOLTA installer on the CD/DVD-ROM to install the KONICA MINOLTA software as this will guide you through the software and network installation. Please follow the instructions in the supplied Quick Guide. Note If you do not wish to, or are unable to use the KONICA MINOLTA installer or any of KONICA MINOLTA's software tools, you can also use the machine's control panel to change network settings. For more information, see Control panel setup on page 17. IP addresses, subnet masks and gateways 2 To use the machine in a networked TCP/IP environment, you need to configure the IP address and subnet mask. The IP address you assign to the print server must be on the same logical network as your host computers. If it is not, you must properly configure the subnet mask and the gateway address. IP address 2 An IP address is a series of numbers that identifies each computer connected to a network. An IP address consists of four numbers separated by dots. Each number is between 0 and 255. „ Example: In a small network, you would normally change the final number. • 192.168.1.1 • 192.168.1.2 • 192.168.1.3 10
-
 1
1 -
2
-
3
-
4
-
5
-
6
-
7
-
8
-
9
-
10
-
11
-
 12
12 -
 13
13 -
 14
14 -
 15
15 -
 16
16 -
 17
17 -
 18
18 -
 19
19 -
 20
20 -
 21
21 -
 22
22 -
23
-
24
-
25
-
26
-
27
-
28
-
29
-
30
-
31
-
32
-
33
-
34
-
35
-
36
-
37
-
38
-
39
-
40
-
41
-
42
-
43
-
44
-
45
-
46
-
47
-
48
-
49
-
50
-
51
-
52
-
53
-
54
-
55
-
56
-
57
-
58
-
59
-
60
-
61
-
62
-
63
-
64
-
65
-
66
-
67
-
68
-
69
-
70
-
71
-
72
-
73
-
74
-
75
-
76
-
77
-
78
-
79
-
80
-
81
-
82
-
83
-
84
-
85
-
86
-
87
-
88
-
89
-
90
-
91
-
92
-
93
-
94
-
95
-
96
-
97
-
98
-
99
-
100
-
101
-
102
-
103
-
104
-
105
-
106
-
107
-
108
-
109
-
110
-
111
-
112
-
113
-
114
-
115
-
116
-
117
-
118
-
119
-
120
-
121
-
122
-
123
-
124
-
125
-
126
-
127
-
128
-
129
-
130
-
131
-
132
-
133
-
134
-
135
-
136
-
137
-
138
-
139
-
140
-
141
-
142
-
143
-
144
-
145
 |
 |
