Kyocera FS 2000D FS-2000D/3900DN/4000DN Operation Guide Rev-1.2 (Advanced Edit - Page 107
Received Data Dump, Others, >Print HEX-DUMP, Processing, Waiting
 |
View all Kyocera FS 2000D manuals
Add to My Manuals
Save this manual to your list of manuals |
Page 107 highlights
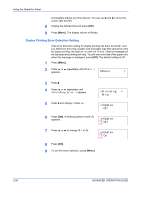
Using the Operation Panel 6 Press ? or @ to increase or decrease the value at the blinking cursor and set the desired time. The timer can be set between 5 and 240 min, in 5minute increments. Use B and A to move the cursor right and left. 7 When the desired timeout time is displayed, press [OK]. 8 To exit the menu selection, press [Menu]. Received Data Dump You can print data received by the printer as hexadecimal code for debugging programs and files. 1 Press [Menu]. 2 Press ? or @ repeatedly until Others > appears. Others > 3 Press B. 4 Press ? or @ repeatedly until >Print HEX-DUMP appears. >Print HEX-DUMP 5 Press [OK]. A question mark (?) appears. >Print HEX-DUMP? 6 Press [OK] again. The message Processing appears for a second, followed by Waiting. Processing Waiting 7 While the message display is indicating Waiting (for 30 seconds by default), send data to be hex-dumped to the printer. The message display indicates Processing while the data is being received. You can cancel printing of any more dump data by pressing [GO] and then [Cancel]. 8 Once all data has been received, the message Waiting will appear. Press [GO] to finish hex-dump printing. ADVANCED OPERATION GUIDE 2-81
-
 1
1 -
2
-
3
-
4
-
5
-
6
-
7
-
8
-
9
-
10
-
11
-
12
-
13
-
14
-
15
-
16
-
17
-
18
-
19
-
20
-
21
-
22
-
23
-
24
-
25
-
26
-
27
-
28
-
29
-
30
-
31
-
32
-
33
-
34
-
35
-
36
-
37
-
38
-
39
-
40
-
41
-
42
-
43
-
44
-
45
-
46
-
47
-
48
-
49
-
50
-
51
-
52
-
53
-
54
-
55
-
56
-
57
-
58
-
59
-
60
-
61
-
62
-
63
-
64
-
65
-
66
-
67
-
68
-
69
-
70
-
71
-
72
-
73
-
74
-
75
-
76
-
77
-
78
-
79
-
80
-
81
-
82
-
83
-
84
-
85
-
86
-
87
-
88
-
89
-
90
-
91
-
92
-
93
-
94
-
95
-
96
-
97
-
98
-
99
-
100
-
101
-
 102
102 -
 103
103 -
 104
104 -
 105
105 -
 106
106 -
 107
107 -
 108
108 -
 109
109 -
 110
110 -
 111
111 -
 112
112 -
113
-
114
-
115
-
116
-
117
-
118
-
119
-
120
-
121
-
122
-
123
-
124
-
125
-
126
-
127
-
128
-
129
-
130
-
131
-
132
-
133
-
134
-
135
-
136
-
137
-
138
-
139
-
140
-
141
-
142
-
143
-
144
-
145
-
146
 |
 |
