Kyocera KM-4850w KM-4850W Operation Guide Rev-8 - Page 35
Functional Copying
 |
View all Kyocera KM-4850w manuals
Add to My Manuals
Save this manual to your list of manuals |
Page 35 highlights
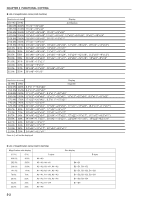
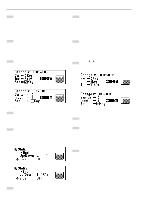
CHAPTER 5 FUNCTIONAL COPYING 1. Zoom mode The magnification ratio can be set by pressing the O or P key. The magnification ratio can be set to from 25% to 400% in 1% or 0.1% increments. The method for setting the magnification ratio is described below. (Inch) (Metric) 2 Ensure that "Standard zoom" is selected. (Inch) (Metric) NOTE • To switch the increment of the magnification ratio between 1% and 0.1%, see "2 Zoom step [Zoom steps] of the default setting. (Page 7-4) • If "APS" has been set, when the magnification ratio is changed, the paper size will be automatically changed. • If the magnification ratio increment is set to 1%, the fractional portion of the number will be dropped. • The minimum cut length of paper is 11" [279 mm]. If reduction and synchronized cut are set and the calculated paper length is less than 11" [279 mm], paper will be cut in length of 11" [279 mm] and a blank area will be added in the trailing edge of the paper. • To make reducing copies, make the length registered in the "‹ Reduce length Ldt. " on page 7-7 longer than the length of originals you use. (1) Standard zoom The magnification ratio to be used is directly selected for reduction or enlargement. For the magnification ratios that can be selected, see "q List of magnification ratios" on page 5-2. 1 Press the Preset R/E key. (Inch) (Metric) 3 Press the OK key. 4 Press the w or v key to select the desired magnification ratio. (Inch) (Metric) 5 Press the OK key. The machine will return to the basic screen. The selected magnification ratio will be displayed. 5-1
-
 1
1 -
2
-
3
-
4
-
5
-
6
-
7
-
8
-
9
-
10
-
11
-
12
-
13
-
14
-
15
-
16
-
17
-
18
-
19
-
20
-
21
-
22
-
23
-
24
-
25
-
26
-
27
-
28
-
29
-
 30
30 -
 31
31 -
 32
32 -
 33
33 -
 34
34 -
 35
35 -
 36
36 -
 37
37 -
 38
38 -
 39
39 -
 40
40 -
41
-
42
-
43
-
44
-
45
-
46
-
47
-
48
-
49
-
50
-
51
-
52
-
53
-
54
-
55
-
56
-
57
-
58
-
59
-
60
-
61
-
62
-
63
-
64
-
65
-
66
-
67
-
68
-
69
-
70
-
71
-
72
-
73
-
74
-
75
-
76
-
77
-
78
-
79
-
80
-
81
-
82
-
83
-
84
-
85
-
86
-
87
-
88
-
89
-
90
-
91
-
92
-
93
-
94
-
95
-
96
-
97
-
98
-
99
-
100
-
101
-
102
-
103
-
104
-
105
-
106
-
107
-
108
 |
 |
