Kyocera KM-4850w KM-4850W Operation Guide Rev-8 - Page 42
Metric, > Setting a margin at the leading edge, > Setting a margin at the trailing edge
 |
View all Kyocera KM-4850w manuals
Add to My Manuals
Save this manual to your list of manuals |
Page 42 highlights
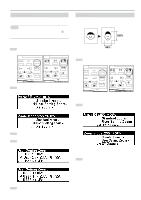
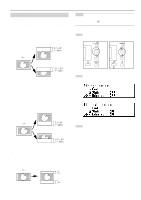
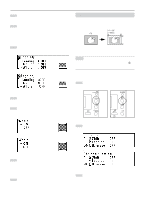
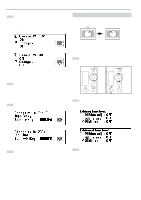
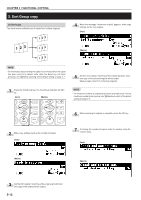
CHAPTER 5 FUNCTIONAL COPYING > Setting a margin at the leading edge 4 Press the w or v key to select "Leading". (Inch) (Metric) > Setting a margin at the trailing edge 10 To set a margin at the trailing edge, press the w or v key to select "Trailing". To complete the setting, proceed to step 16. (Inch) (Metric) 5 Press the OK key. 6 The margin setting will be displayed in the top line of the message display. "+" indicates the amount of margin to be added at the leading edge. "-" indicates the amount of margin to be cut at the leading edge. • To change the preset value, press the w or v key to select "Change". • To accept the value without change, ensure that "ON" is selected. 7 Press the OK key. • If "Change" has been selected, proceed to the next step. • If "ON" has been selected, proceed to step 10. 8 Press the w or v key to select "+" or "-" and use the numeric keys to enter the amount of margin. (Inch) 11 Press the OK key. 12 The margin setting will be displayed in the top line of the message display. "+" indicates the amount of margin to be added at the trailing edge. "-" indicates the amount of margin to be cut at the trailing edge. • To change the preset value, press the w or v key to select "Change". • To accept the value without change, ensure that "ON" is selected. 13 Press the OK key. • If "Change" has been selected, proceed to the next step. • If "ON" has been selected, proceed to step 16. 14 Press the w or v key to select "+" or "-" and use the numeric keys to enter the amount of margin. (Metric) (Inch) 9 Press the OK key. 5-8 (Metric)
-
 1
1 -
2
-
3
-
4
-
5
-
6
-
7
-
8
-
9
-
10
-
11
-
12
-
13
-
14
-
15
-
16
-
17
-
18
-
19
-
20
-
21
-
22
-
23
-
24
-
25
-
26
-
27
-
28
-
29
-
30
-
31
-
32
-
33
-
34
-
35
-
36
-
 37
37 -
 38
38 -
 39
39 -
 40
40 -
 41
41 -
 42
42 -
 43
43 -
 44
44 -
 45
45 -
 46
46 -
 47
47 -
48
-
49
-
50
-
51
-
52
-
53
-
54
-
55
-
56
-
57
-
58
-
59
-
60
-
61
-
62
-
63
-
64
-
65
-
66
-
67
-
68
-
69
-
70
-
71
-
72
-
73
-
74
-
75
-
76
-
77
-
78
-
79
-
80
-
81
-
82
-
83
-
84
-
85
-
86
-
87
-
88
-
89
-
90
-
91
-
92
-
93
-
94
-
95
-
96
-
97
-
98
-
99
-
100
-
101
-
102
-
103
-
104
-
105
-
106
-
107
-
108
 |
 |
