LG LN272S User Guide - Page 9
Get Started, Your Phone at a Glance, Set Up Your Phone
 |
View all LG LN272S manuals
Add to My Manuals
Save this manual to your list of manuals |
Page 9 highlights
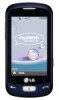
Get Started This section gives you all the information you need to set up your phone and Sprint service for the first time. Your Phone at a Glance The following illustrations outline your phone's primary external features and buttons. Set Up Your Phone You must first install and charge the battery to begin setting up your phone. 1. Install the battery Remove the battery from its packaging. Insert the battery into the battery compartment in the back of the phone. Make sure the connectors align (see step 1 in the following illustration). Gently press down to secure the battery (see step 2 in the following illustration). Get Started 1
-
 1
1 -
2
-
3
-
 4
4 -
 5
5 -
 6
6 -
 7
7 -
 8
8 -
 9
9 -
 10
10 -
 11
11 -
 12
12 -
 13
13 -
 14
14 -
15
-
16
-
17
-
18
-
19
-
20
-
21
-
22
-
23
-
24
-
25
-
26
-
27
-
28
-
29
-
30
-
31
-
32
-
33
-
34
-
35
-
36
-
37
-
38
-
39
-
40
-
41
-
42
-
43
-
44
-
45
-
46
-
47
-
48
-
49
-
50
-
51
-
52
-
53
-
54
-
55
-
56
-
57
-
58
-
59
-
60
-
61
-
62
-
63
-
64
-
65
-
66
-
67
-
68
-
69
-
70
-
71
-
72
-
73
-
74
-
75
-
76
-
77
-
78
-
79
-
80
-
81
-
82
-
83
-
84
-
85
-
86
-
87
-
88
-
89
-
90
-
91
-
92
-
93
-
94
-
95
-
96
-
97
-
98
-
99
-
100
-
101
-
102
-
103
-
104
-
105
-
106
-
107
-
108
-
109
-
110
-
111
-
112
 |
 |

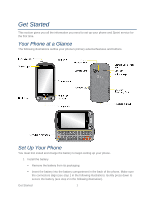
Get Started
1
Get Started
This section gives you all the information you need to set up your phone and Sprint service for
the first time.
Your Phone at a Glance
The following illustrations outline your phone's primary external features and buttons.
Set Up Your Phone
You must first install and charge the battery to begin setting up your phone.
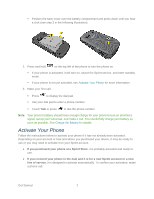
1. Install the battery
Remove the battery from its packaging.
Insert the battery into the battery compartment in the back of the phone. Make sure
the connectors align (see step 1 in the following illustration). Gently press down to
secure the battery (see step 2 in the following illustration).