Lantronix SGX 5150 User Guide - Page 110
To Con the Terminal Network Connection, Using Web Manager, Using the CLI, Using XML,
 |
View all Lantronix SGX 5150 manuals
Add to My Manuals
Save this manual to your list of manuals |
Page 110 highlights
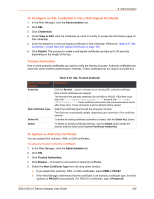
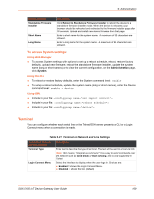
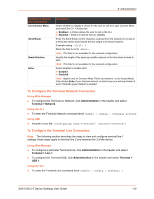
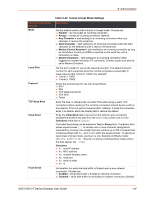
9: Administration Terminal on Network and Line Settings Exit Connect Menu Send Break Break Duration Echo Description Select whether to display a choice for the user to exit the Login Connect Menu and reach the CLI. Choices are: Enabled = a choice allows the user to exit to the CLI. Disabled = there is no exit to the CLI (default) Enter the Send Break control character received from the network on its way to a serial line which would cause the line output to be forced inactive. Example setting: Y Blank the field to set to . Note: This field is not available for line network configuration. Specify the length of the spacing condition placed on the line when a break is sent. Note: This field is not available for line network configuration. Select whether to enable echo: Enabled Disabled Note: Applies only to Connect Mode Telnet connections, not to Accept Mode. Only disable Echo if your terminal echoes, in which case you will see double of each character typed. Default is enabled. To Configure the Terminal Network Connection Using Web Manager To configure the Terminal on Network, click Administration in the header and select Terminal > Network. Using the CLI To enter the Terminal Network command level: enable > config > terminal network Using XML Include in your file: To Configure the Terminal Line Connection Note: The following section describes the steps to view and configure terminal line 1 settings; these steps apply to terminal line 2 and terminal line 3 of the device. Using Web Manager To configure a particular Terminal Line, click Administration in the header and select Terminal > Line 1. To configure the Terminal USB, click Administration in the header and select Terminal > USB 1. Using the CLI To enter the Terminal Line command level: enable > config > terminal 1 SGX 5150 IoT Device Gateway User Guide 110
-
 1
1 -
2
-
3
-
4
-
5
-
6
-
7
-
8
-
9
-
10
-
11
-
12
-
13
-
14
-
15
-
16
-
17
-
18
-
19
-
20
-
21
-
22
-
23
-
24
-
25
-
26
-
27
-
28
-
29
-
30
-
31
-
32
-
33
-
34
-
35
-
36
-
37
-
38
-
39
-
40
-
41
-
42
-
43
-
44
-
45
-
46
-
47
-
48
-
49
-
50
-
51
-
52
-
53
-
54
-
55
-
56
-
57
-
58
-
59
-
60
-
61
-
62
-
63
-
64
-
65
-
66
-
67
-
68
-
69
-
70
-
71
-
72
-
73
-
74
-
75
-
76
-
77
-
78
-
79
-
80
-
81
-
82
-
83
-
84
-
85
-
86
-
87
-
88
-
89
-
90
-
91
-
92
-
93
-
94
-
95
-
96
-
97
-
98
-
99
-
100
-
101
-
102
-
103
-
104
-
 105
105 -
 106
106 -
 107
107 -
 108
108 -
 109
109 -
 110
110 -
 111
111 -
 112
112 -
 113
113 -
 114
114 -
 115
115 -
116
-
117
-
118
-
119
-
120
-
121
-
122
-
123
-
124
-
125
-
126
-
127
-
128
-
129
 |
 |
