Lenovo PC 300PL User guide for IBM PC300PL (type 6584, 6594) systems - Page 107
Working with memory
 |
View all Lenovo PC 300PL manuals
Add to My Manuals
Save this manual to your list of manuals |
Page 107 highlights
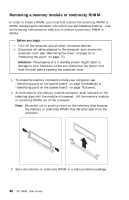
4. Place the cover on the computer frame. Secure the cover by sliding it until the cover aligns with the rear of the computer. 5. If a cover lock is present, go to the back of the computer and lock the cover. 6. Reconnect the external cables and cords to the computer. 7. Plug the power cords into properly grounded electrical outlets. 8. Update the computer configuration. See "Updating the computer configuration" on page 102. Note: If an error message related to the chassis-intrusion detector appears after you restart your computer, you must enter the administrator password. For more information, see "Using passwords" on page 40. What to do next To complete the installation, go to "Completing the installation" on page 101. Working with memory You can add memory to your computer to increase system performance. Your computer has three connectors (RIMM 1, RIMM 2, and RIMM 3) for installing system memory modules. The maximum amount of system memory your computer supports is 1 GB. Chapter 5. Installing options 93
-
 1
1 -
2
-
3
-
4
-
5
-
6
-
7
-
8
-
9
-
10
-
11
-
12
-
13
-
14
-
15
-
16
-
17
-
18
-
19
-
20
-
21
-
22
-
23
-
24
-
25
-
26
-
27
-
28
-
29
-
30
-
31
-
32
-
33
-
34
-
35
-
36
-
37
-
38
-
39
-
40
-
41
-
42
-
43
-
44
-
45
-
46
-
47
-
48
-
49
-
50
-
51
-
52
-
53
-
54
-
55
-
56
-
57
-
58
-
59
-
60
-
61
-
62
-
63
-
64
-
65
-
66
-
67
-
68
-
69
-
70
-
71
-
72
-
73
-
74
-
75
-
76
-
77
-
78
-
79
-
80
-
81
-
82
-
83
-
84
-
85
-
86
-
87
-
88
-
89
-
90
-
91
-
92
-
93
-
94
-
95
-
96
-
97
-
98
-
99
-
100
-
101
-
 102
102 -
 103
103 -
 104
104 -
 105
105 -
 106
106 -
 107
107 -
 108
108 -
 109
109 -
 110
110 -
 111
111 -
 112
112 -
113
-
114
-
115
-
116
-
117
-
118
-
119
-
120
-
121
-
122
-
123
-
124
-
125
-
126
-
127
-
128
-
129
-
130
-
131
-
132
-
133
-
134
-
135
-
136
-
137
-
138
-
139
-
140
-
141
-
142
-
143
-
144
-
145
-
146
-
147
-
148
-
149
-
150
-
151
-
152
-
153
-
154
-
155
-
156
-
157
-
158
-
159
-
160
-
161
-
162
-
163
-
164
-
165
-
166
-
167
-
168
-
169
-
170
-
171
-
172
-
173
-
174
-
175
-
176
-
177
-
178
-
179
-
180
-
181
-
182
-
183
-
184
-
185
-
186
-
187
-
188
-
189
-
190
-
191
-
192
-
193
-
194
 |
 |
