Lenovo PC 300PL User guide for IBM PC300PL (type 6584, 6594) systems - Page 115
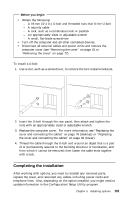
Completing the installation
 |
View all Lenovo PC 300PL manuals
Add to My Manuals
Save this manual to your list of manuals |
Page 115 highlights
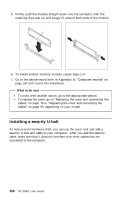
Before you begin: Obtain the following: - A 19-mm (3/4 in.) U-bolt and threaded nuts that fit the U-bolt - A security cable - A lock, such as a combination lock or padlock - An appropriately sized or adjustable wrench - A small, flat-blade screwdriver Turn off the computer and all other connected devices. Disconnect all external cables and power cords and remove the computer cover (see "Removing the cover" on page 61 or "Removing the cover" on page 77). To install a U-bolt: 1. Use a tool, such as a screwdriver, to remove the two metal knockouts. 2. Insert the U-bolt through the rear panel; then attach and tighten the nuts with an appropriately sized or adjustable wrench. 3. Replace the computer cover. For more information, see "Replacing the cover and connecting the cables" on page 76 (desktop) or "Replacing the cover and connecting the cables" on page 92 (tower). 4. Thread the cable through the U-bolt and around an object that is a part of or permanently secured to the building structure or foundation, and from which it cannot be removed; then fasten the cable ends together with a lock. Completing the installation After working with options, you need to reinstall any removed parts, replace the cover, and reconnect any cables, including power cords and telephone lines. Also, depending on the option installed, you might need to update information in the Configuration/Setup Utility program. Chapter 5. Installing options 101
-
 1
1 -
2
-
3
-
4
-
5
-
6
-
7
-
8
-
9
-
10
-
11
-
12
-
13
-
14
-
15
-
16
-
17
-
18
-
19
-
20
-
21
-
22
-
23
-
24
-
25
-
26
-
27
-
28
-
29
-
30
-
31
-
32
-
33
-
34
-
35
-
36
-
37
-
38
-
39
-
40
-
41
-
42
-
43
-
44
-
45
-
46
-
47
-
48
-
49
-
50
-
51
-
52
-
53
-
54
-
55
-
56
-
57
-
58
-
59
-
60
-
61
-
62
-
63
-
64
-
65
-
66
-
67
-
68
-
69
-
70
-
71
-
72
-
73
-
74
-
75
-
76
-
77
-
78
-
79
-
80
-
81
-
82
-
83
-
84
-
85
-
86
-
87
-
88
-
89
-
90
-
91
-
92
-
93
-
94
-
95
-
96
-
97
-
98
-
99
-
100
-
101
-
102
-
103
-
104
-
105
-
106
-
107
-
108
-
109
-
 110
110 -
 111
111 -
 112
112 -
 113
113 -
 114
114 -
 115
115 -
 116
116 -
 117
117 -
 118
118 -
 119
119 -
 120
120 -
121
-
122
-
123
-
124
-
125
-
126
-
127
-
128
-
129
-
130
-
131
-
132
-
133
-
134
-
135
-
136
-
137
-
138
-
139
-
140
-
141
-
142
-
143
-
144
-
145
-
146
-
147
-
148
-
149
-
150
-
151
-
152
-
153
-
154
-
155
-
156
-
157
-
158
-
159
-
160
-
161
-
162
-
163
-
164
-
165
-
166
-
167
-
168
-
169
-
170
-
171
-
172
-
173
-
174
-
175
-
176
-
177
-
178
-
179
-
180
-
181
-
182
-
183
-
184
-
185
-
186
-
187
-
188
-
189
-
190
-
191
-
192
-
193
-
194
 |
 |
