Lenovo PC 300PL User guide for IBM PC300PL (type 6584, 6594) systems - Page 112
Removing a memory module or continuity RIMM
 |
View all Lenovo PC 300PL manuals
Add to My Manuals
Save this manual to your list of manuals |
Page 112 highlights
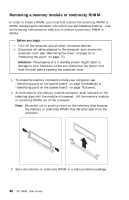
Removing a memory module or continuity RIMM In order to install a RIMM, you must first remove the continuity RIMM or RIMM occupying the connector into which you are installing memory. Use the following instructions to help you to remove a continuity RIMM or RIMM. Before you begin Turn off the computer and all other connected devices. Disconnect all cables attached to the computer and remove the computer cover (see "Removing the cover" on page 61 or "Removing the cover" on page 77). Attention: The presence of 5 V standby power might result in damage to your hardware unless you disconnect the power cord from the wall before opening the computer cover. 1. To locate the memory connectors inside your computer, see "Identifying parts on the system board" on page 64 (desktop) or "Identifying parts on the system board" on page 78 (tower). 2. At both ends of the memory module connector, push outward on the retaining clips until the module is loosened. Lift the memory module or continuity RIMM out of the connector. Note: Be careful not to push too hard on the retaining clips because the memory or continuity RIMM may abruptly eject from the connector. 3. Store the memory or continuity RIMM in a static-protective package. 98 PC 300PL User Guide
-
 1
1 -
2
-
3
-
4
-
5
-
6
-
7
-
8
-
9
-
10
-
11
-
12
-
13
-
14
-
15
-
16
-
17
-
18
-
19
-
20
-
21
-
22
-
23
-
24
-
25
-
26
-
27
-
28
-
29
-
30
-
31
-
32
-
33
-
34
-
35
-
36
-
37
-
38
-
39
-
40
-
41
-
42
-
43
-
44
-
45
-
46
-
47
-
48
-
49
-
50
-
51
-
52
-
53
-
54
-
55
-
56
-
57
-
58
-
59
-
60
-
61
-
62
-
63
-
64
-
65
-
66
-
67
-
68
-
69
-
70
-
71
-
72
-
73
-
74
-
75
-
76
-
77
-
78
-
79
-
80
-
81
-
82
-
83
-
84
-
85
-
86
-
87
-
88
-
89
-
90
-
91
-
92
-
93
-
94
-
95
-
96
-
97
-
98
-
99
-
100
-
101
-
102
-
103
-
104
-
105
-
106
-
 107
107 -
 108
108 -
 109
109 -
 110
110 -
 111
111 -
 112
112 -
 113
113 -
 114
114 -
 115
115 -
 116
116 -
 117
117 -
118
-
119
-
120
-
121
-
122
-
123
-
124
-
125
-
126
-
127
-
128
-
129
-
130
-
131
-
132
-
133
-
134
-
135
-
136
-
137
-
138
-
139
-
140
-
141
-
142
-
143
-
144
-
145
-
146
-
147
-
148
-
149
-
150
-
151
-
152
-
153
-
154
-
155
-
156
-
157
-
158
-
159
-
160
-
161
-
162
-
163
-
164
-
165
-
166
-
167
-
168
-
169
-
170
-
171
-
172
-
173
-
174
-
175
-
176
-
177
-
178
-
179
-
180
-
181
-
182
-
183
-
184
-
185
-
186
-
187
-
188
-
189
-
190
-
191
-
192
-
193
-
194
 |
 |
