Lenovo ThinkPad 300 Service Guide - Page 16
Entering, Setup, Utility - thinkpad x300 ssd
 |
View all Lenovo ThinkPad 300 manuals
Add to My Manuals
Save this manual to your list of manuals |
Page 16 highlights
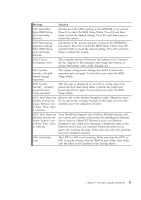
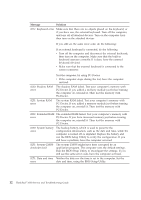
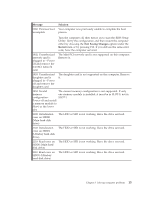
How can I contact the Customer Support Center? See Chapter 6, "Getting help and service," on page 47 of this Guide. For the phone numbers of the Customer Support Center nearest to you, see "Worldwide telephone list" on page 49. Where can I find warranty information? See the separate Safety and Warranty Guide for detailed warranty information. For the warranty applicable to your computer, including the warranty period and type of warranty service, see Appendix A, "Warranty information," on page 55. Entering the BIOS Setup Utility Your computer provides a program, called BIOS Setup Utility, that enables you to select various setup parameters. v Config: Set the configuration of your computer. v Date/Time: Set the date and time. v Security: Set security features. v Startup: Set the startup device. v Restart: Restart the system. v HDD diagnostic program: Run the diagnostic test of the HDD or SSD. To enter the BIOS Setup Utility, do as follows: 1. To protect yourself against accidental loss of data, back up your data and computer registry. For details, see "Basics" in Access Help. 2. Turn off the computer, and then turn it on again. 3. When the ThinkPad logo comes up, immediately press F1 to enter the BIOS Setup Utility. If you have set a supervisor password, the BIOS Setup Utility menu appears after you enter the password. You can start the utility by pressing Enter instead of entering the supervisor password; however, you cannot change the parameters that are protected by the supervisor password. For more information, see the on-board help. 4. Using the cursor keys, move to an item you want to change. When the item you want is highlighted, press Enter. A submenu is displayed. 5. Change the items you wish to change. To change the value of an item, use the F5 or F6 key. If the item has a submenu, you can display it by pressing Enter. 6. Press F3 or Esc to exit from the submenu. If you are in a nested submenu, press Esc repeatedly until you reach the BIOS Setup Utility menu. Note: If you need to restore the settings to their original state as of the time of purchase, press F9 key to load the default settings. You can also select an option in the Restart submenu to load the default settings or discard the changes. 8 ThinkPad® X300 Service and Troubleshooting Guide
-
 1
1 -
2
-
3
-
4
-
5
-
6
-
7
-
8
-
9
-
10
-
 11
11 -
 12
12 -
 13
13 -
 14
14 -
 15
15 -
 16
16 -
 17
17 -
 18
18 -
 19
19 -
 20
20 -
 21
21 -
22
-
23
-
24
-
25
-
26
-
27
-
28
-
29
-
30
-
31
-
32
-
33
-
34
-
35
-
36
-
37
-
38
-
39
-
40
-
41
-
42
-
43
-
44
-
45
-
46
-
47
-
48
-
49
-
50
-
51
-
52
-
53
-
54
-
55
-
56
-
57
-
58
-
59
-
60
-
61
-
62
-
63
-
64
-
65
-
66
-
67
-
68
-
69
-
70
-
71
-
72
-
73
-
74
-
75
-
76
-
77
-
78
-
79
-
80
-
81
-
82
-
83
-
84
-
85
-
86
 |
 |
