Lenovo ThinkPad 300 Service Guide - Page 41
Restoring, factory, contents, using, recovery, discs
 |
View all Lenovo ThinkPad 300 manuals
Add to My Manuals
Save this manual to your list of manuals |
Page 41 highlights
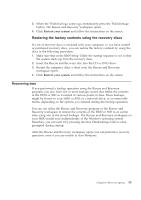
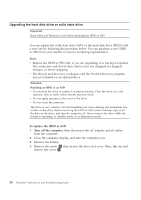
3. When the ThinkPad logo comes up, immediately press the ThinkVantage button. The Rescue and Recovery workspace opens. 4. Click Restore your system and follow the instructions on the screen. Restoring the factory contents using the recovery discs If a set of recovery discs is enclosed with your computer, or you have created or purchased recovery discs, you can restore the factory contents by using the discs in the following procedure: 1. Make sure that in the BIOS Setup Utility the startup sequence is set so that the system starts up from the recovery discs. 2. Insert the Rescue and Recovery disc into the CD or DVD drive. 3. Restart the computer. After a short wait, the Rescue and Recovery workspace opens. 4. Click Restore your system and follow the instructions on the screen. Recovering data If you performed a backup operation using the Rescue and Recovery program, you also have one or more backups stored that reflect the contents of the HDD or SSD as it existed at various points in time. These backups might be stored on your HDD or SSD, or a network drive, or on removable media, depending on the options you selected during the backup operation. You can use either the Rescue and Recovery program or the Rescue and Recovery workspace to restore the contents of the HDD or SSD to an earlier state using any of the stored backups. The Rescue and Recovery workspace on your HDD model runs independently of the Windows operating system. Therefore, you can start it by pressing the blue ThinkVantage button when prompted during startup. After the Rescue and Recovery workspace opens you can perform a recovery operation, even if you are unable to start Windows. Chapter 4. Recovery options 33
-
 1
1 -
2
-
3
-
4
-
5
-
6
-
7
-
8
-
9
-
10
-
11
-
12
-
13
-
14
-
15
-
16
-
17
-
18
-
19
-
20
-
21
-
22
-
23
-
24
-
25
-
26
-
27
-
28
-
29
-
30
-
31
-
32
-
33
-
34
-
35
-
 36
36 -
 37
37 -
 38
38 -
 39
39 -
 40
40 -
 41
41 -
 42
42 -
 43
43 -
 44
44 -
 45
45 -
 46
46 -
47
-
48
-
49
-
50
-
51
-
52
-
53
-
54
-
55
-
56
-
57
-
58
-
59
-
60
-
61
-
62
-
63
-
64
-
65
-
66
-
67
-
68
-
69
-
70
-
71
-
72
-
73
-
74
-
75
-
76
-
77
-
78
-
79
-
80
-
81
-
82
-
83
-
84
-
85
-
86
 |
 |
