Lenovo ThinkPad Yoga (English) User Guide - Page 19
Right-side view, Tablet Digitizer Pen on some models, Power button, Start, Settings, Power, Shut down
 |
View all Lenovo ThinkPad Yoga manuals
Add to My Manuals
Save this manual to your list of manuals |
Page 19 highlights
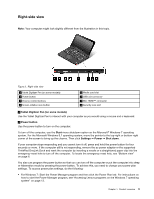
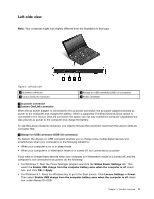
Right-side view Note: Your computer might look slightly different from the illustration in this topic. Figure 2. Right-side view 1 Tablet Digitizer Pen (on some models) 2 Power button 3 Volume control buttons 4 Screen rotation lock button 5 Media card slot 6 USB 3.0 connector 7 Mini HDMI™ connector 8 Security-lock slot 1 Tablet Digitizer Pen (on some models) Use the Tablet Digitizer Pen to interact with your computer as you would using a mouse and a keyboard. 2 Power button Use the power button to turn on the computer. To turn off the computer, use the Start menu shutdown option on the Microsoft® Windows 7 operating system. For the Microsoft Windows 8.1 operating system, move the pointer to the top-right or bottom-right corner of the screen to bring up the charms. Then click Settings ➙ Power ➙ Shut down. If your computer stops responding and you cannot turn it off, press and hold the power button for four seconds or more. If the computer still is not responding, remove the ac power adapter or the supported ThinkPad OneLink Dock and reset the computer by inserting a needle or a straightened paper clip into the emergency-reset hole to turn off the computer. To locate the emergency-reset hole, see "Bottom view" on page 6. You also can program the power button so that you can turn off the computer or put the computer into sleep or hibernation mode by pressing the power button. To achieve this, you need to change your power plan settings. To access power plan settings, do the following: • For Windows 7: Start the Power Manager program and then click the Power Plan tab. For instructions on how to start the Power Manager program, see "Accessing Lenovo programs on the Windows 7 operating system" on page 13. Chapter 1. Product overview 3
-
 1
1 -
2
-
3
-
4
-
5
-
6
-
7
-
8
-
9
-
10
-
11
-
12
-
13
-
 14
14 -
 15
15 -
 16
16 -
 17
17 -
 18
18 -
 19
19 -
 20
20 -
 21
21 -
 22
22 -
 23
23 -
 24
24 -
25
-
26
-
27
-
28
-
29
-
30
-
31
-
32
-
33
-
34
-
35
-
36
-
37
-
38
-
39
-
40
-
41
-
42
-
43
-
44
-
45
-
46
-
47
-
48
-
49
-
50
-
51
-
52
-
53
-
54
-
55
-
56
-
57
-
58
-
59
-
60
-
61
-
62
-
63
-
64
-
65
-
66
-
67
-
68
-
69
-
70
-
71
-
72
-
73
-
74
-
75
-
76
-
77
-
78
-
79
-
80
-
81
-
82
-
83
-
84
-
85
-
86
-
87
-
88
-
89
-
90
-
91
-
92
-
93
-
94
-
95
-
96
-
97
-
98
-
99
-
100
-
101
-
102
-
103
-
104
-
105
-
106
-
107
-
108
-
109
-
110
-
111
-
112
-
113
-
114
-
115
-
116
-
117
-
118
-
119
-
120
-
121
-
122
-
123
-
124
-
125
-
126
-
127
-
128
-
129
-
130
-
131
-
132
-
133
-
134
-
135
-
136
-
137
-
138
-
139
-
140
-
141
-
142
-
143
-
144
-
145
-
146
-
147
-
148
-
149
-
150
-
151
-
152
 |
 |
