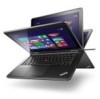
Lenovo ThinkPad Yoga (English) User Guide - Page 67
Using a flash media card, The Add Hardware Wizard starts.
 |
View all Lenovo ThinkPad Yoga manuals
Add to My Manuals
Save this manual to your list of manuals |
Page 67 highlights
• For Windows 8.1, do one of the following: - Configure the camera settings directly from the program that is using the camera. For details, see the help information system of the program. - Click Lenovo Settings from the Start screen. Then click Camera. Follow the instructions on the screen to configure the camera settings as desired. • For Windows 7: Start the Communications Utility program and configure the camera settings as desired. Using a flash media card Your computer has a media card slot, it supports the following cards: • MultiMediaCard (MMC) module • Secure Digital eXtended-Capacity(SDXC) card • Secure Digital (SD) card • Secure Digital High-Capacity (SDHC) card Note: Your computer does not support the CPRM feature for the SD card. Attention: While transferring data to or from a flash media card, such as an SD card, do not put your computer into sleep or hibernation mode before the data transfer completes; otherwise, your data could become damaged. Installing a flash media card Attention: • Before you start installing a card, touch a metal table or a grounded metal object. This action reduces any static electricity from your body. Static electricity could damage the card. To install a flash media card, do the following: 1. Ensure that the card is correctly oriented. 2. Insert the card firmly into the slot of the 4-in-1 media card reader. If the plug-and-play feature is not enabled for the installed flash media card, do the following to enable the feature: 1. Go to Control Panel. 2. Click Hardware and Sound. 3. Click Device Manager. If you are prompted for an administrator password or confirmation, type the password or provide confirmation. 4. From the Action menu, select Add legacy hardware. The Add Hardware Wizard starts. 5. Follow the instructions on the screen. Removing a flash media card Attention: • Before removing a card, stop the card first. Otherwise, data on the card might be damaged or lost. • Do not remove a card while the computer is in sleep mode or hibernation mode. Otherwise, the system might not respond when you try to resume operation. To remove a card, do the following: 1. Click the triangular icon on the windows notification area to show hidden icons. Then, right-click the Safely Remove Hardware and Eject Media icon. Chapter 2. Using your computer 51
-
 1
1 -
2
-
3
-
4
-
5
-
6
-
7
-
8
-
9
-
10
-
11
-
12
-
13
-
14
-
15
-
16
-
17
-
18
-
19
-
20
-
21
-
22
-
23
-
24
-
25
-
26
-
27
-
28
-
29
-
30
-
31
-
32
-
33
-
34
-
35
-
36
-
37
-
38
-
39
-
40
-
41
-
42
-
43
-
44
-
45
-
46
-
47
-
48
-
49
-
50
-
51
-
52
-
53
-
54
-
55
-
56
-
57
-
58
-
59
-
60
-
61
-
 62
62 -
 63
63 -
 64
64 -
 65
65 -
 66
66 -
 67
67 -
 68
68 -
 69
69 -
 70
70 -
 71
71 -
 72
72 -
73
-
74
-
75
-
76
-
77
-
78
-
79
-
80
-
81
-
82
-
83
-
84
-
85
-
86
-
87
-
88
-
89
-
90
-
91
-
92
-
93
-
94
-
95
-
96
-
97
-
98
-
99
-
100
-
101
-
102
-
103
-
104
-
105
-
106
-
107
-
108
-
109
-
110
-
111
-
112
-
113
-
114
-
115
-
116
-
117
-
118
-
119
-
120
-
121
-
122
-
123
-
124
-
125
-
126
-
127
-
128
-
129
-
130
-
131
-
132
-
133
-
134
-
135
-
136
-
137
-
138
-
139
-
140
-
141
-
142
-
143
-
144
-
145
-
146
-
147
-
148
-
149
-
150
-
151
-
152
 |
 |