Lexmark M410 Service Manual - Page 53
Insert Tray 1, Paper Jam message displays, paper is jammed before
 |
UPC - 734646261005
View all Lexmark M410 manuals
Add to My Manuals
Save this manual to your list of manuals |
Page 53 highlights
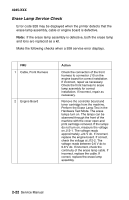
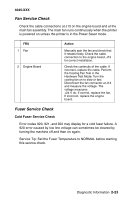
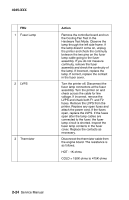
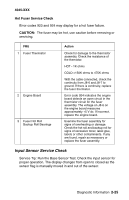
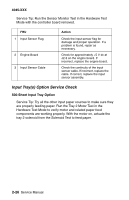
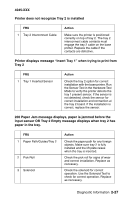
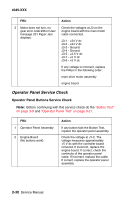
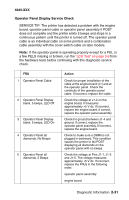
4045-XXX Printer does not recognize Tray 2 is installed FRU 1 Tray 2 Interconnect Cable Action Make sure the printer is positioned correctly on top of tray 2. The tray 2 interconnect cable contacts must engage the tray 2 cable on the base printer. Replace the cable if the contacts are defective. Printer displays message "Insert Tray 1" when trying to print from Tray 2 FRU 1 Tray 1 Inserted Sensor Action Check the tray 2 option for correct installation with the base printer. Run the Sensor Test in the Hardware Test Mode to verify the printer detects the tray 1 present sensor. If the sensor is not detected, check the sensor for correct installation and connection at the tray 2 board. If the installation is correct, replace the sensor. 200 Paper Jam message displays, paper is jammed before the input sensor OR Tray 2 Empty message displays when tray 2 has paper in the tray. FRU 1 Paper Path/Guides/Tray 2 2 Pick Roll 3 Solenoid Action Check the paper path for any foreign objects. Make sure tray 2 is fully installed and the lift plate raises when the tray is inserted. Check the pick roll for signs of wear and correct installation. Replace as necessary. Check the solenoid for correct operation. Use the Solenoid Test to check for correct operation. Replace as necessary. Diagnostic Information 2-27
-
 1
1 -
2
-
3
-
4
-
5
-
6
-
7
-
8
-
9
-
10
-
11
-
12
-
13
-
14
-
15
-
16
-
17
-
18
-
19
-
20
-
21
-
22
-
23
-
24
-
25
-
26
-
27
-
28
-
29
-
30
-
31
-
32
-
33
-
34
-
35
-
36
-
37
-
38
-
39
-
40
-
41
-
42
-
43
-
44
-
45
-
46
-
47
-
 48
48 -
 49
49 -
 50
50 -
 51
51 -
 52
52 -
 53
53 -
 54
54 -
 55
55 -
 56
56 -
 57
57 -
 58
58 -
59
-
60
-
61
-
62
-
63
-
64
-
65
-
66
-
67
-
68
-
69
-
70
-
71
-
72
-
73
-
74
-
75
-
76
-
77
-
78
-
79
-
80
-
81
-
82
-
83
-
84
-
85
-
86
-
87
-
88
-
89
-
90
-
91
-
92
-
93
-
94
-
95
-
96
-
97
-
98
-
99
-
100
-
101
-
102
-
103
-
104
-
105
-
106
-
107
-
108
-
109
-
110
-
111
-
112
-
113
-
114
-
115
-
116
-
117
-
118
-
119
-
120
-
121
-
122
-
123
-
124
-
125
-
126
-
127
-
128
-
129
-
130
-
131
-
132
-
133
-
134
-
135
-
136
-
137
-
138
-
139
-
140
-
141
-
142
-
143
-
144
-
145
-
146
-
147
-
148
-
149
-
150
-
151
-
152
-
153
-
154
-
155
-
156
-
157
-
158
-
159
-
160
-
161
-
162
-
163
-
164
-
165
-
166
-
167
-
168
-
169
-
170
-
171
-
172
-
173
-
174
-
175
-
176
-
177
-
178
-
179
-
180
-
181
-
182
-
183
-
184
-
185
-
186
-
187
-
188
-
189
-
190
-
191
-
192
-
193
-
194
-
195
 |
 |
