Lexmark M410 Service Manual - Page 99
Cooling Fan / Fuser Control Test, To run the Cooling Fan Test/Fuser Control Test
 |
UPC - 734646261005
View all Lexmark M410 manuals
Add to My Manuals
Save this manual to your list of manuals |
Page 99 highlights
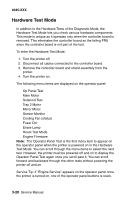
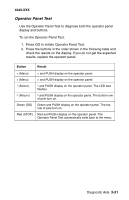
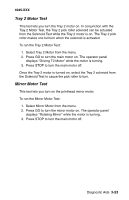
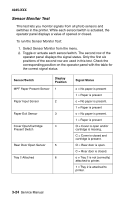
4045-XXX Cooling Fan / Fuser Control Test This test lets you turn on the cooling fan to slow and fast speeds. The fuser warms to standby temperature when the fan is set to slow speed and to printing temperature when the fan is set to fast speed. The fuser turns off when the fan turns off. To run the Cooling Fan Test/Fuser Control Test: 1. Select Cooling Fan (status) from the menu. Status displays the current status of the fan (Stop, Slow, or Fast). 2. Press GO to turn the fan on to Fast. Pressing GO again alternates the fan speed from Fast to Slow. Press STOP to turn the fan off. Once the cooling fan turns on, press the right menu > button to monitor fuser temperature rise. "Heating Print" displays on the top line of the operator panel. The number displayed on the bottom left of the operator panel is a preset thermistor value corresponding to either standby or printing fuser temperatures, depending on whether the cooling fan is set to slow or fast. The number displayed on the bottom right of the operator panel is the current thermistor value. This value increases from 0 and stabilizes somewhat near the preset thermistor value. The numbers themselves are not actual temperature measurements. However, the higher the value, the higher the thermistor temperature. The two numbers are used only in comparison with each other to assure the fuser temperature control system is working properly. Note: The message "Error!! 00 10 24" displays if the thermistor is disconnected or defective. The message "Error!! 00 20 23" displays if the thermistor detects the fuser is too hot or if the thermistor circuit is shorted. Diagnostic Aids 3-25
-
 1
1 -
2
-
3
-
4
-
5
-
6
-
7
-
8
-
9
-
10
-
11
-
12
-
13
-
14
-
15
-
16
-
17
-
18
-
19
-
20
-
21
-
22
-
23
-
24
-
25
-
26
-
27
-
28
-
29
-
30
-
31
-
32
-
33
-
34
-
35
-
36
-
37
-
38
-
39
-
40
-
41
-
42
-
43
-
44
-
45
-
46
-
47
-
48
-
49
-
50
-
51
-
52
-
53
-
54
-
55
-
56
-
57
-
58
-
59
-
60
-
61
-
62
-
63
-
64
-
65
-
66
-
67
-
68
-
69
-
70
-
71
-
72
-
73
-
74
-
75
-
76
-
77
-
78
-
79
-
80
-
81
-
82
-
83
-
84
-
85
-
86
-
87
-
88
-
89
-
90
-
91
-
92
-
93
-
 94
94 -
 95
95 -
 96
96 -
 97
97 -
 98
98 -
 99
99 -
 100
100 -
 101
101 -
 102
102 -
 103
103 -
 104
104 -
105
-
106
-
107
-
108
-
109
-
110
-
111
-
112
-
113
-
114
-
115
-
116
-
117
-
118
-
119
-
120
-
121
-
122
-
123
-
124
-
125
-
126
-
127
-
128
-
129
-
130
-
131
-
132
-
133
-
134
-
135
-
136
-
137
-
138
-
139
-
140
-
141
-
142
-
143
-
144
-
145
-
146
-
147
-
148
-
149
-
150
-
151
-
152
-
153
-
154
-
155
-
156
-
157
-
158
-
159
-
160
-
161
-
162
-
163
-
164
-
165
-
166
-
167
-
168
-
169
-
170
-
171
-
172
-
173
-
174
-
175
-
176
-
177
-
178
-
179
-
180
-
181
-
182
-
183
-
184
-
185
-
186
-
187
-
188
-
189
-
190
-
191
-
192
-
193
-
194
-
195
 |
 |
