Lexmark M410 Service Manual - Page 89
Viewing the Permanent Count, Setting Configuration ID
 |
UPC - 734646261005
View all Lexmark M410 manuals
Add to My Manuals
Save this manual to your list of manuals |
Page 89 highlights
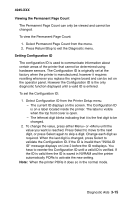
4045-XXX Viewing the Permanent Page Count The Permanent Page Count can only be viewed and cannot be changed. To view the Permanent Page Count: 1. Select Permanent Page Count from the menu. 2. Press Return/Stop to exit the Diagnostic menu. Setting Configuration ID The configuration ID is used to communicate information about certain areas of the printer that cannot be determined using hardware sensors. The Configuration ID is originally set at the factory when the printer is manufactured, however it requires resetting whenever you replace the engine board and can be set on the operator panel. However the Configuration ID is the only diagnostic function displayed until a valid ID is entered. To set the Configuration ID: 1. Select Configuration ID from the Printer Setup menu. - The current ID displays on the screen. The Configuration ID is on a label located inside the printer. The label is visible when the top front cover is open. - The leftmost digit blinks indicating that it is the first digit to be changed. 2. To change the value, press either Menu> or
-
 1
1 -
2
-
3
-
4
-
5
-
6
-
7
-
8
-
9
-
10
-
11
-
12
-
13
-
14
-
15
-
16
-
17
-
18
-
19
-
20
-
21
-
22
-
23
-
24
-
25
-
26
-
27
-
28
-
29
-
30
-
31
-
32
-
33
-
34
-
35
-
36
-
37
-
38
-
39
-
40
-
41
-
42
-
43
-
44
-
45
-
46
-
47
-
48
-
49
-
50
-
51
-
52
-
53
-
54
-
55
-
56
-
57
-
58
-
59
-
60
-
61
-
62
-
63
-
64
-
65
-
66
-
67
-
68
-
69
-
70
-
71
-
72
-
73
-
74
-
75
-
76
-
77
-
78
-
79
-
80
-
81
-
82
-
83
-
 84
84 -
 85
85 -
 86
86 -
 87
87 -
 88
88 -
 89
89 -
 90
90 -
 91
91 -
 92
92 -
 93
93 -
 94
94 -
95
-
96
-
97
-
98
-
99
-
100
-
101
-
102
-
103
-
104
-
105
-
106
-
107
-
108
-
109
-
110
-
111
-
112
-
113
-
114
-
115
-
116
-
117
-
118
-
119
-
120
-
121
-
122
-
123
-
124
-
125
-
126
-
127
-
128
-
129
-
130
-
131
-
132
-
133
-
134
-
135
-
136
-
137
-
138
-
139
-
140
-
141
-
142
-
143
-
144
-
145
-
146
-
147
-
148
-
149
-
150
-
151
-
152
-
153
-
154
-
155
-
156
-
157
-
158
-
159
-
160
-
161
-
162
-
163
-
164
-
165
-
166
-
167
-
168
-
169
-
170
-
171
-
172
-
173
-
174
-
175
-
176
-
177
-
178
-
179
-
180
-
181
-
182
-
183
-
184
-
185
-
186
-
187
-
188
-
189
-
190
-
191
-
192
-
193
-
194
-
195
 |
 |
