Lexmark M410 Service Manual - Page 74
Transfer Roll Service Check, CAUTION
 |
UPC - 734646261005
View all Lexmark M410 manuals
Add to My Manuals
Save this manual to your list of manuals |
Page 74 highlights
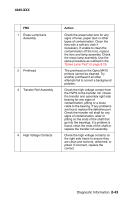
4045-XXX Transfer Roll Service Check Service Tip: The circumference of the transfer roll is 52 mm. Any print quality problems such as lines that are spaced 52 mm apart indicate you should check the transfer roll for damage, toner or foreign material buildup. CAUTION: Make sure the printer is powered Off before making any checks on the transfer roll or associated parts for personal safety and to prevent damage to the printer. FRU Action 1 Transfer Roll Assembly 2 Left Transfer Arm Assembly 3 Right Transfer Arm Assembly Check the transfer roll for any signs of toner buildup, surface damage to the roll, oil or other contaminants on the surface of the roll. Replace the transfer roll as necessary. Check the left transfer roll arm assembly to make sure it is fastened and locked in the down position. If the arm is not locked down, check to ensure the arm is not broken and will lock into the EP frame correctly. Check the left transfer arm assembly spring for proper operation. Check the right transfer arm assembly to make sure it is fastened and locked in the down position. If the arm is not locked down, check to make sure the arm is not broken and will lock into the EP frame correctly. Check the right transfer arm assembly spring for proper operation. For any background problems, check to ensure the contact to the HVPS board is correct and that there is approximately 0 ohms resistance between the transfer roll shaft and the HVPS contact. If correct, go to "Print Quality - Background" on page 2-42. 2-48 Service Manual
-
 1
1 -
2
-
3
-
4
-
5
-
6
-
7
-
8
-
9
-
10
-
11
-
12
-
13
-
14
-
15
-
16
-
17
-
18
-
19
-
20
-
21
-
22
-
23
-
24
-
25
-
26
-
27
-
28
-
29
-
30
-
31
-
32
-
33
-
34
-
35
-
36
-
37
-
38
-
39
-
40
-
41
-
42
-
43
-
44
-
45
-
46
-
47
-
48
-
49
-
50
-
51
-
52
-
53
-
54
-
55
-
56
-
57
-
58
-
59
-
60
-
61
-
62
-
63
-
64
-
65
-
66
-
67
-
68
-
 69
69 -
 70
70 -
 71
71 -
 72
72 -
 73
73 -
 74
74 -
 75
75 -
 76
76 -
 77
77 -
 78
78 -
 79
79 -
80
-
81
-
82
-
83
-
84
-
85
-
86
-
87
-
88
-
89
-
90
-
91
-
92
-
93
-
94
-
95
-
96
-
97
-
98
-
99
-
100
-
101
-
102
-
103
-
104
-
105
-
106
-
107
-
108
-
109
-
110
-
111
-
112
-
113
-
114
-
115
-
116
-
117
-
118
-
119
-
120
-
121
-
122
-
123
-
124
-
125
-
126
-
127
-
128
-
129
-
130
-
131
-
132
-
133
-
134
-
135
-
136
-
137
-
138
-
139
-
140
-
141
-
142
-
143
-
144
-
145
-
146
-
147
-
148
-
149
-
150
-
151
-
152
-
153
-
154
-
155
-
156
-
157
-
158
-
159
-
160
-
161
-
162
-
163
-
164
-
165
-
166
-
167
-
168
-
169
-
170
-
171
-
172
-
173
-
174
-
175
-
176
-
177
-
178
-
179
-
180
-
181
-
182
-
183
-
184
-
185
-
186
-
187
-
188
-
189
-
190
-
191
-
192
-
193
-
194
-
195
 |
 |
