Lexmark P350 User's Guide - Page 46
Improving print quality, Photo
 |
View all Lexmark P350 manuals
Add to My Manuals
Save this manual to your list of manuals |
Page 46 highlights
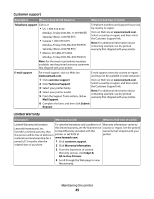
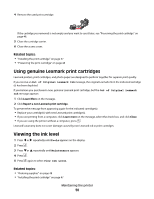
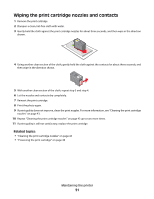
Record the following information (located on the store receipt and the back of the printer), and have it ready when you contact us so that we may serve you faster: • Machine Type number • Serial number • Date purchased • Store where purchased Improving print quality If you are not satisfied with the print quality of a photo, make sure you: • Use the appropriate paper for the photo. For best results, use Lexmark Perfectfinish Photo Paper or Lexmark Photo Paper. Note: Do not use Lexmark Premium Photo Paper. Your print cartridge is not compatible with this type of paper. • Load the paper with the glossy or printable side facing you. (If you are not sure which side is the printable side, see the instructions that came with the paper.) • Select Photo as the print quality. Note: To prevent smudging or scratching, avoid touching the printed surface with your fingers or sharp objects. For best results, remove each printed sheet individually from the paper exit tray, and allow the prints to dry at least 24 hours before stacking, displaying, or storing. If the photo still does not have the print quality you want, follow these steps: 1 Align the print cartridge. For more information, see "Aligning the print cartridge" on page 42. If print quality has not improved, continue to step 2. 2 Clean the print cartridge nozzles. For more information, see "Cleaning the print cartridge nozzles" on page 43. If print quality has not improved, continue to step 3. 3 Remove and reinsert the print cartridge. For more information, see "Removing a used print cartridge" on page 49 and "Installing the print cartridge" on page 47. If print quality has not improved, continue to step 4. 4 Wipe the print cartridge nozzles and contacts. For more information, see "Wiping the print cartridge nozzles and contacts" on page 51. If print quality is still not satisfactory, replace the print cartridge. For more information, see "Ordering supplies" on page 48. Related topics: • "Aligning the print cartridge" on page 42 • "Cleaning the print cartridge nozzles" on page 43 • "Removing a used print cartridge" on page 49 • "Ordering supplies" on page 48 • "Wiping the print cartridge nozzles and contacts" on page 51 Maintaining the printer 46
-
 1
1 -
2
-
3
-
4
-
5
-
6
-
7
-
8
-
9
-
10
-
11
-
12
-
13
-
14
-
15
-
16
-
17
-
18
-
19
-
20
-
21
-
22
-
23
-
24
-
25
-
26
-
27
-
28
-
29
-
30
-
31
-
32
-
33
-
34
-
35
-
36
-
37
-
38
-
39
-
40
-
 41
41 -
 42
42 -
 43
43 -
 44
44 -
 45
45 -
 46
46 -
 47
47 -
 48
48 -
 49
49 -
 50
50 -
 51
51 -
52
-
53
-
54
-
55
-
56
-
57
-
58
-
59
-
60
-
61
-
62
-
63
-
64
-
65
-
66
-
67
-
68
 |
 |