Lexmark P350 User's Guide - Page 9
Viewing photos, Replacing screen saver photos on the control panel display
 |
View all Lexmark P350 manuals
Add to My Manuals
Save this manual to your list of manuals |
Page 9 highlights
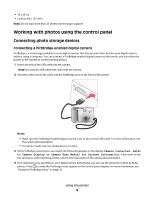
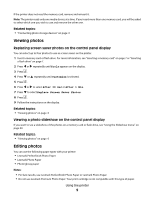
If the printer does not read the memory card, remove and reinsert it. Note: The printer reads only one media device at a time. If you insert more than one memory card, you will be asked to select which one you wish to use and remove the other one. Related topics: • "Connecting photo storage devices" on page 0 Viewing photos Replacing screen saver photos on the control panel display You can select up to four photos to use as screen savers on the printer. 1 Insert a memory card or flash drive. For more information, see "Inserting a memory card" on page 7 or "Inserting a flash drive" on page 7. 2 Press or repeatedly until Tools appears on the display. 3 Press . 4 Press or repeatedly until Customize is selected. 5 Press . 6 Press or to select After 30 Sec or After 1 Min. 7 Press to select Replace Screen Saver Photos. 8 Press . 9 Follow the instructions on the display. Related topics: • "Viewing photos" on page 0 Viewing a photo slideshow on the control panel display If you want to see a slideshow of the photos on a memory card or flash drive, see "Using the Slideshow menu" on page 30. Related topics: • "Viewing photos" on page 0 Editing photos You can use the following paper types with your printer: • Lexmark Perfectfinish Photo Paper • Lexmark Photo Paper • Photo/glossy paper Notes: • For best results, use Lexmark Perfectfinish Photo Paper or Lexmark Photo Paper. • Do not use Lexmark Premium Photo Paper. Your print cartridge is not compatible with this type of paper. Using the printer 9
-
 1
1 -
2
-
3
-
 4
4 -
 5
5 -
 6
6 -
 7
7 -
 8
8 -
 9
9 -
 10
10 -
 11
11 -
 12
12 -
 13
13 -
 14
14 -
15
-
16
-
17
-
18
-
19
-
20
-
21
-
22
-
23
-
24
-
25
-
26
-
27
-
28
-
29
-
30
-
31
-
32
-
33
-
34
-
35
-
36
-
37
-
38
-
39
-
40
-
41
-
42
-
43
-
44
-
45
-
46
-
47
-
48
-
49
-
50
-
51
-
52
-
53
-
54
-
55
-
56
-
57
-
58
-
59
-
60
-
61
-
62
-
63
-
64
-
65
-
66
-
67
-
68
 |
 |