Netgear PR2000 User Manual (Cellular Version) - Page 24
Internet via, Power Off, Wireless, admin, password, Power Inputs, Antenna Orientation
 |
View all Netgear PR2000 manuals
Add to My Manuals
Save this manual to your list of manuals |
Page 24 highlights
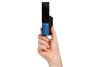
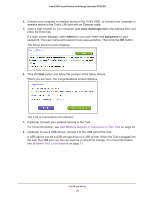
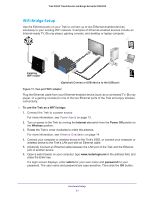
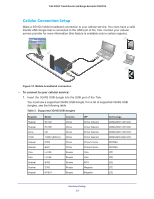
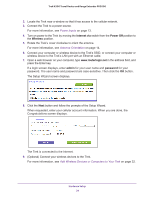
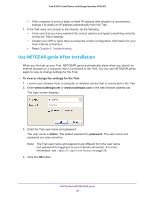
Trek N300 Travel Router and Range Extender PR2000 2. Locate the Trek near a window so that it has access to the cellular network. 3. Connect the Trek to a power source. For more information, see Power Inputs on page 13. 4. Turn on power to the Trek by moving the Internet via switch from the Power Off position to the Wireless position. 5. Rotate the Trek's cover clockwise to orient the antenna. For more information, see Antenna Orientation on page 14. 6. Connect your computer or wireless device to the Trek's SSID, or connect your computer or wireless device to the Trek's LAN port with an Ethernet cable. 7. Open a web browser on your computer, type www.routerlogin.net in the address field, and press the Enter key. If a login screen displays, enter admin for your user name and password for your password. The user name and password are case-sensitive. Then click the OK button. The Setup Wizard screen displays. 8. Click the Next button and follow the prompts of the Setup Wizard. When requested, enter your cellular account information. When you are done, the Congratulations screen displays. The Trek is connected to the Internet. 9. (Optional) Connect your wireless devices to the Trek. For more information, see Add Wireless Devices or Computers to Your Trek on page 32. Hardware Setup 24
-
 1
1 -
2
-
3
-
4
-
5
-
6
-
7
-
8
-
9
-
10
-
11
-
12
-
13
-
14
-
15
-
16
-
17
-
18
-
 19
19 -
 20
20 -
 21
21 -
 22
22 -
 23
23 -
 24
24 -
 25
25 -
 26
26 -
 27
27 -
 28
28 -
 29
29 -
30
-
31
-
32
-
33
-
34
-
35
-
36
-
37
-
38
-
39
-
40
-
41
-
42
-
43
-
44
-
45
-
46
-
47
-
48
-
49
-
50
-
51
-
52
-
53
-
54
-
55
-
56
-
57
-
58
-
59
-
60
-
61
-
62
-
63
-
64
-
65
-
66
-
67
-
68
-
69
-
70
-
71
-
72
-
73
-
74
-
75
-
76
-
77
-
78
-
79
-
80
-
81
-
82
-
83
-
84
-
85
-
86
-
87
-
88
-
89
-
90
-
91
-
92
-
93
-
94
-
95
-
96
-
97
-
98
-
99
-
100
-
101
-
102
-
103
-
104
-
105
-
106
-
107
-
108
-
109
-
110
-
111
-
112
-
113
-
114
-
115
-
116
-
117
-
118
-
119
-
120
-
121
-
122
-
123
-
124
-
125
-
126
-
127
-
128
-
129
-
130
-
131
-
132
-
133
-
134
-
135
-
136
-
137
-
138
-
139
-
140
-
141
-
142
-
143
-
144
-
145
-
146
-
147
-
148
-
149
 |
 |
