Netgear PR2000 User Manual (Cellular Version) - Page 26
Trek Setup Preparation, Use Standard TCP/IP Properties for DHCP, Gather ISP Information - ip address
 |
View all Netgear PR2000 manuals
Add to My Manuals
Save this manual to your list of manuals |
Page 26 highlights
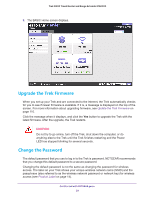
Trek N300 Travel Router and Range Extender PR2000 Trek Setup Preparation You can set up your Trek with the NETGEAR genie automatically, or you can use the genie menus and screens to set up your Trek manually. However, before you start the setup process, you need to have your ISP information on hand and make sure the laptops, computers, and other devices in the network have the required settings. Use Standard TCP/IP Properties for DHCP If you set up your computer to use a static IP address, you must change the settings so that it uses Dynamic Host Configuration Protocol (DHCP). Gather ISP Information For DSL broadband service, when your Internet service starts, your Internet service provider (ISP) typically gives you all of the information needed to connect to the Internet. You might need this information to set up the Trek to use your Internet service. If you cannot locate this information, ask your ISP to provide it. When your Internet connection is working, you no longer need to launch the ISP login program on your computer to access the Internet. When you start an Internet application, your Trek automatically logs you in. You might need the following information to set up your Trek: • The ISP configuration information for your DSL account • ISP login name and password • Fixed or static IP address settings (special deployment by ISP) Wireless Devices and Security Settings Make sure that the wireless device or computer that you are using supports WPA or WPA2 wireless security, which is the wireless security supported by the Trek. For information about the Trek's preconfigured security settings, see Basic Wireless Settings on page 44. Types of Logins and Access Different types of logins have different purposes. It is important that you understand the difference so that you know which login to use when. Types of logins: • Trek login. The login that your ISP provided logs you in to the Trek interface from NETGEAR genie. See Use NETGEAR genie After Installation on page 28 for details about this login. • ISP login. This logs you in to your Internet service. Your service provider gave you this login information in a letter or some other way. If you cannot find this login information, contact your service provider. Get Started with NETGEAR genie 26
-
 1
1 -
2
-
3
-
4
-
5
-
6
-
7
-
8
-
9
-
10
-
11
-
12
-
13
-
14
-
15
-
16
-
17
-
18
-
19
-
20
-
 21
21 -
 22
22 -
 23
23 -
 24
24 -
 25
25 -
 26
26 -
 27
27 -
 28
28 -
 29
29 -
 30
30 -
 31
31 -
32
-
33
-
34
-
35
-
36
-
37
-
38
-
39
-
40
-
41
-
42
-
43
-
44
-
45
-
46
-
47
-
48
-
49
-
50
-
51
-
52
-
53
-
54
-
55
-
56
-
57
-
58
-
59
-
60
-
61
-
62
-
63
-
64
-
65
-
66
-
67
-
68
-
69
-
70
-
71
-
72
-
73
-
74
-
75
-
76
-
77
-
78
-
79
-
80
-
81
-
82
-
83
-
84
-
85
-
86
-
87
-
88
-
89
-
90
-
91
-
92
-
93
-
94
-
95
-
96
-
97
-
98
-
99
-
100
-
101
-
102
-
103
-
104
-
105
-
106
-
107
-
108
-
109
-
110
-
111
-
112
-
113
-
114
-
115
-
116
-
117
-
118
-
119
-
120
-
121
-
122
-
123
-
124
-
125
-
126
-
127
-
128
-
129
-
130
-
131
-
132
-
133
-
134
-
135
-
136
-
137
-
138
-
139
-
140
-
141
-
142
-
143
-
144
-
145
-
146
-
147
-
148
-
149
 |
 |
