Netgear PR2000 User Manual (Cellular Version) - Page 32
Add Wireless Devices or Computers to Your Trek, Manual Method
 |
View all Netgear PR2000 manuals
Add to My Manuals
Save this manual to your list of manuals |
Page 32 highlights
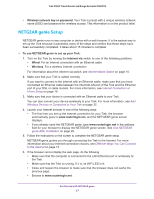
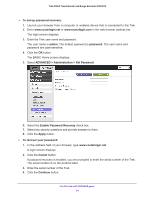
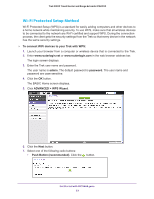
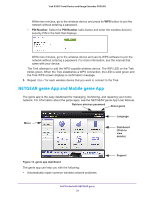
Trek N300 Travel Router and Range Extender PR2000 A screen displays requesting the answers to your security questions. 5. Enter the saved answers to your security questions. 6. Click the Continue button. A screen displays your recovered password. 7. Click the Login again button. A login screen displays. 8. With your recovered password, log in to the Trek. Add Wireless Devices or Computers to Your Trek Connect wireless devices such as desktops, laptops, smartphones, and tablets to your Trek. You can connect these WiFi devices either manually or using the WPS (Wi-Fi Protected Setup) method. For best wireless connection performance, rotate the Trek's cover clockwise to position its antenna properly. For more information, see Antenna Orientation on page 14. Manual Method To connect WiFi devices manually to your Trek: 1. From your wireless device, view the available wireless networks. For more information, see the manual that came with your device. 2. From the list of available wireless networks, select the wireless network name (SSID) of the Trek. The SSID is printed on the product label. 3. From your wireless device, initiate a wireless connection. For more information, see the manual that came with your device. 4. When prompted by your wireless device, enter the wireless network key (password) of the Trek. The password is printed on the product label. 5. From the screen of your wireless device, click the appropriate button to continue the connection procedure. You are connected wirelessly to the Trek. 6. Repeat Step 1 through Step 5 for each wireless device that you want to connect to the Trek. Get Started with NETGEAR genie 32
-
 1
1 -
2
-
3
-
4
-
5
-
6
-
7
-
8
-
9
-
10
-
11
-
12
-
13
-
14
-
15
-
16
-
17
-
18
-
19
-
20
-
21
-
22
-
23
-
24
-
25
-
26
-
 27
27 -
 28
28 -
 29
29 -
 30
30 -
 31
31 -
 32
32 -
 33
33 -
 34
34 -
 35
35 -
 36
36 -
 37
37 -
38
-
39
-
40
-
41
-
42
-
43
-
44
-
45
-
46
-
47
-
48
-
49
-
50
-
51
-
52
-
53
-
54
-
55
-
56
-
57
-
58
-
59
-
60
-
61
-
62
-
63
-
64
-
65
-
66
-
67
-
68
-
69
-
70
-
71
-
72
-
73
-
74
-
75
-
76
-
77
-
78
-
79
-
80
-
81
-
82
-
83
-
84
-
85
-
86
-
87
-
88
-
89
-
90
-
91
-
92
-
93
-
94
-
95
-
96
-
97
-
98
-
99
-
100
-
101
-
102
-
103
-
104
-
105
-
106
-
107
-
108
-
109
-
110
-
111
-
112
-
113
-
114
-
115
-
116
-
117
-
118
-
119
-
120
-
121
-
122
-
123
-
124
-
125
-
126
-
127
-
128
-
129
-
130
-
131
-
132
-
133
-
134
-
135
-
136
-
137
-
138
-
139
-
140
-
141
-
142
-
143
-
144
-
145
-
146
-
147
-
148
-
149
 |
 |
