Netgear PR2000 User Manual (Cellular Version) - Page 84
Access Your USB Storage Device Remotely, Connect using, different credentials, Finish
 |
View all Netgear PR2000 manuals
Add to My Manuals
Save this manual to your list of manuals |
Page 84 highlights
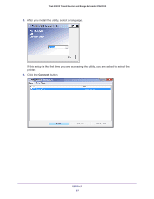
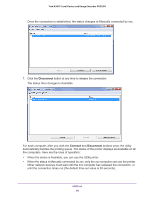
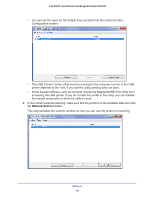
Trek N300 Travel Router and Range Extender PR2000 3. Launch readyshareconnect.exe. 4. Select the drive letter that you want to map to the network folder. 5. If you want to connect to the USB drive as a different user, select the Connect using different credentials check box. a. Type the user name and password that you want to use. b. Click the OK button. 6. Click the Finish button. The USB drive is mapped to the drive letter that you specified. Access Your USB Storage Device Remotely When you connect the USB device to the Trek USB port, it might take up to two minutes before it is ready for sharing. You can access your USB storage device remotely. To access the USB drive from a remote computer: 1. Launch a web browser. 2. Connect using the Trek's Internet port IP address. If you are using Dynamic DNS, you can type the DNS name, rather than the IP address. You can view the Trek's Internet IP address on the BASIC Home screen (see Internet Setup on page 37. To use remote FTP access, make sure that the FTP check box is selected in the Access Method section of the USB Storage (Advanced Settings) screen. For more information, see Configure the USB Storage Device and Access Settings on page 74. To access the USB drive with FTP from a remote computer: 1. Launch a web browser. 2. Type ftp:// and the Internet port IP address in the address field of the browser. For example, type ftp://10.1.65.4. USB Port 84
-
 1
1 -
2
-
3
-
4
-
5
-
6
-
7
-
8
-
9
-
10
-
11
-
12
-
13
-
14
-
15
-
16
-
17
-
18
-
19
-
20
-
21
-
22
-
23
-
24
-
25
-
26
-
27
-
28
-
29
-
30
-
31
-
32
-
33
-
34
-
35
-
36
-
37
-
38
-
39
-
40
-
41
-
42
-
43
-
44
-
45
-
46
-
47
-
48
-
49
-
50
-
51
-
52
-
53
-
54
-
55
-
56
-
57
-
58
-
59
-
60
-
61
-
62
-
63
-
64
-
65
-
66
-
67
-
68
-
69
-
70
-
71
-
72
-
73
-
74
-
75
-
76
-
77
-
78
-
 79
79 -
 80
80 -
 81
81 -
 82
82 -
 83
83 -
 84
84 -
 85
85 -
 86
86 -
 87
87 -
 88
88 -
 89
89 -
90
-
91
-
92
-
93
-
94
-
95
-
96
-
97
-
98
-
99
-
100
-
101
-
102
-
103
-
104
-
105
-
106
-
107
-
108
-
109
-
110
-
111
-
112
-
113
-
114
-
115
-
116
-
117
-
118
-
119
-
120
-
121
-
122
-
123
-
124
-
125
-
126
-
127
-
128
-
129
-
130
-
131
-
132
-
133
-
134
-
135
-
136
-
137
-
138
-
139
-
140
-
141
-
142
-
143
-
144
-
145
-
146
-
147
-
148
-
149
 |
 |
