Netgear PR2000 User Manual (Cellular Version) - Page 28
Use NETGEAR genie After Installation - review
 |
View all Netgear PR2000 manuals
Add to My Manuals
Save this manual to your list of manuals |
Page 28 highlights
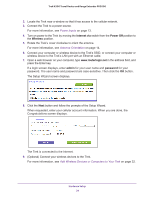
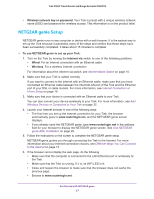
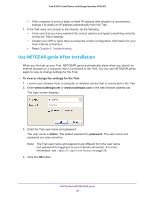
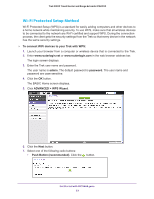
Trek N300 Travel Router and Range Extender PR2000 • If the computer is set to a static or fixed IP address (this situation is uncommon), change it to obtain an IP address automatically from the Trek. 7. If the Trek does not connect to the Internet, do the following: • To be sure that you have selected the correct options and typed everything correctly, review the Trek's settings. • Contact your ISP to verify that you have the correct configuration information for your main Internet connection. • Read Chapter 9, Troubleshooting. Use NETGEAR genie After Installation When you first set up your Trek, NETGEAR genie automatically starts when you launch an Internet browser on a computer that is connected to the Trek. You can use NETGEAR genie again to view or change settings for the Trek. To view or change the settings for the Trek: 1. Launch your browser from a computer or wireless device that is connected to the Trek. 2. Enter www.routerlogin.net or www.routerlogin.com in the web browser address bar. The login screen displays. admin ******** 3. Enter the Trek user name and password. The user name is admin. The default password is password. The user name and password are case-sensitive. Note: The Trek user name and password are different from the user name and password for logging in to your Internet connection. For more information, see Types of Logins and Access on page 26. 4. Click the OK button. Get Started with NETGEAR genie 28
-
 1
1 -
2
-
3
-
4
-
5
-
6
-
7
-
8
-
9
-
10
-
11
-
12
-
13
-
14
-
15
-
16
-
17
-
18
-
19
-
20
-
21
-
22
-
 23
23 -
 24
24 -
 25
25 -
 26
26 -
 27
27 -
 28
28 -
 29
29 -
 30
30 -
 31
31 -
 32
32 -
 33
33 -
34
-
35
-
36
-
37
-
38
-
39
-
40
-
41
-
42
-
43
-
44
-
45
-
46
-
47
-
48
-
49
-
50
-
51
-
52
-
53
-
54
-
55
-
56
-
57
-
58
-
59
-
60
-
61
-
62
-
63
-
64
-
65
-
66
-
67
-
68
-
69
-
70
-
71
-
72
-
73
-
74
-
75
-
76
-
77
-
78
-
79
-
80
-
81
-
82
-
83
-
84
-
85
-
86
-
87
-
88
-
89
-
90
-
91
-
92
-
93
-
94
-
95
-
96
-
97
-
98
-
99
-
100
-
101
-
102
-
103
-
104
-
105
-
106
-
107
-
108
-
109
-
110
-
111
-
112
-
113
-
114
-
115
-
116
-
117
-
118
-
119
-
120
-
121
-
122
-
123
-
124
-
125
-
126
-
127
-
128
-
129
-
130
-
131
-
132
-
133
-
134
-
135
-
136
-
137
-
138
-
139
-
140
-
141
-
142
-
143
-
144
-
145
-
146
-
147
-
148
-
149
 |
 |
