Netgear RN528X Software Manual - Page 170
Con Static Routes, Create a VLAN, System Settings, ReadyNAS OS 6.7
 |
View all Netgear RN528X manuals
Add to My Manuals
Save this manual to your list of manuals |
Page 170 highlights
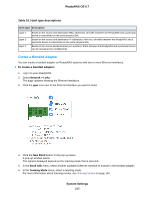
ReadyNAS OS 6.7 6. Reconfigure the switch or router to which the ReadyNAS is attached for single interfaces. Configure Static Routes You can add and remove static routes. Static routes are not frequently used with ReadyNAS, but a few situations call for them. For example, if no automatically routed path to a device exists that the ReadyNAS must access, you can define a static path to it. Before configuring a static route, you must configure the ReadyNAS adapter, its Ethernet address, and subnet mask. To configure a static route, there must be a gateway between the network the ReadyNAS is on, and the network with the destination address. There is an address for the gateway on the network the ReadyNAS is on, and there is an address for the gateway on the network the destination address is on. Before configuring the static route, determine the gateway address on the network the ReadyNAS is on. You must also know the target IP address and the subnet mask for the target's network. As a sample configuration, your ReadyNAS uses separate network connections to connect to the Internet and to a private network, and the default gateway is configured to connect to the Internet. The ReadyNAS can connect to anything on the private network and on the Internet, but if another private network is connected to the private network, the ReadyNAS cannot automatically find devices on the second private network. For example, one network interface on the ReadyNAS might use the address 10.1.0.1 to connect to a private network with addresses in the range 10.1.xxx.xxx. The 10.1 network connects to a private network with a server with the address 192.168.1.0 and with subnet mask 255.255.255.0. No automatic route exists from the ReadyNAS to the server, but you can specify a static route. For this example, the address 10.1.0.2 is the address of the gateway between the two private networks. To configure a static route: 1. Log in to your ReadyNAS admin page. 2. Select Network > Routes. The window updates to show the configured routes. 3. Click the + button. The New Route page displays. 4. Enter the destination IP address in the IP Address field. In the sample configuration, the destination IP address is the address of the server, 192.168.1.0. 5. Enter the subnet mask for the destination network in the Subnet Mask field. In the sample configuration, the subnet mask is 255.255.255.0. 6. Enter the gateway address configured on the ReadyNAS in the Gateway field. In the sample configuration, the gateway address is 10.1.0.2. 7. Select the adapter on the ReadyNAS used for the private network from the Adapter menu. The IP address and subnet mask for that adapter fills automatically. 8. Click the Add button. The new static route shows in the list of routes. Create a VLAN You can create VLANs from any of the Ethernet interfaces on your ReadyNAS device. System Settings 170
-
 1
1 -
2
-
3
-
4
-
5
-
6
-
7
-
8
-
9
-
10
-
11
-
12
-
13
-
14
-
15
-
16
-
17
-
18
-
19
-
20
-
21
-
22
-
23
-
24
-
25
-
26
-
27
-
28
-
29
-
30
-
31
-
32
-
33
-
34
-
35
-
36
-
37
-
38
-
39
-
40
-
41
-
42
-
43
-
44
-
45
-
46
-
47
-
48
-
49
-
50
-
51
-
52
-
53
-
54
-
55
-
56
-
57
-
58
-
59
-
60
-
61
-
62
-
63
-
64
-
65
-
66
-
67
-
68
-
69
-
70
-
71
-
72
-
73
-
74
-
75
-
76
-
77
-
78
-
79
-
80
-
81
-
82
-
83
-
84
-
85
-
86
-
87
-
88
-
89
-
90
-
91
-
92
-
93
-
94
-
95
-
96
-
97
-
98
-
99
-
100
-
101
-
102
-
103
-
104
-
105
-
106
-
107
-
108
-
109
-
110
-
111
-
112
-
113
-
114
-
115
-
116
-
117
-
118
-
119
-
120
-
121
-
122
-
123
-
124
-
125
-
126
-
127
-
128
-
129
-
130
-
131
-
132
-
133
-
134
-
135
-
136
-
137
-
138
-
139
-
140
-
141
-
142
-
143
-
144
-
145
-
146
-
147
-
148
-
149
-
150
-
151
-
152
-
153
-
154
-
155
-
156
-
157
-
158
-
159
-
160
-
161
-
162
-
163
-
164
-
 165
165 -
 166
166 -
 167
167 -
 168
168 -
 169
169 -
 170
170 -
 171
171 -
 172
172 -
 173
173 -
 174
174 -
 175
175 -
176
-
177
-
178
-
179
-
180
-
181
-
182
-
183
-
184
-
185
-
186
-
187
-
188
-
189
-
190
-
191
-
192
-
193
-
194
-
195
-
196
-
197
-
198
-
199
-
200
-
201
-
202
-
203
-
204
-
205
-
206
-
207
-
208
-
209
-
210
-
211
-
212
-
213
-
214
-
215
-
216
-
217
-
218
-
219
-
220
-
221
-
222
-
223
-
224
-
225
-
226
-
227
-
228
-
229
-
230
-
231
-
232
-
233
-
234
-
235
-
236
-
237
-
238
-
239
-
240
-
241
-
242
-
243
-
244
-
245
-
246
-
247
-
248
-
249
-
250
-
251
-
252
-
253
-
254
-
255
 |
 |
